

Disclosure: This article contains affiliate links. We may earn a commission from purchases at no extra cost to you, which helps our travel content.
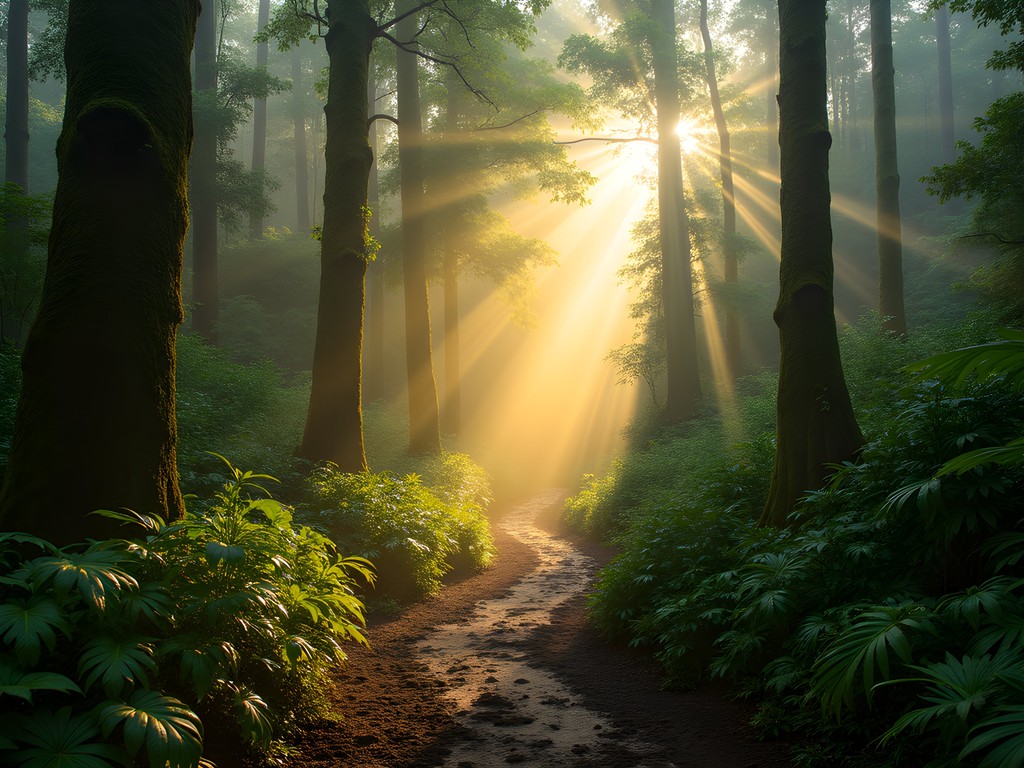
The first time a wild indri's call echoed through Andasibe's misty canopy, I froze mid-step on the muddy trail, camera forgotten at my side. That haunting, whale-like song reverberated through my chest before my brain could even process what I was hearing. Madagascar has a way of disarming you like that – moments of pure wonder that transcend the viewfinder. After photographing monasteries perched on impossible cliffs across three continents, I thought I'd seen nature's most dramatic displays. But here, in this evolutionary laboratory floating off Africa's eastern coast, I discovered an entirely different kind of magic – one that requires equal parts technical preparation, infinite patience, and a willingness to embrace the unexpected. This is my field guide to capturing the extraordinary biodiversity of Andasibe-Mantadia National Park, where 90% of the wildlife exists nowhere else on Earth.

Preparing Your Gear for Madagascar's Challenges
After fifteen years documenting ancient structures in arid landscapes, Madagascar's rainforest environment required a complete rethinking of my equipment strategy. Andasibe receives over 1,700mm of rainfall annually – most concentrated during the November-April wet season. Even in the 'dry' months when I visited, afternoon showers transformed trails into slick obstacle courses within minutes.
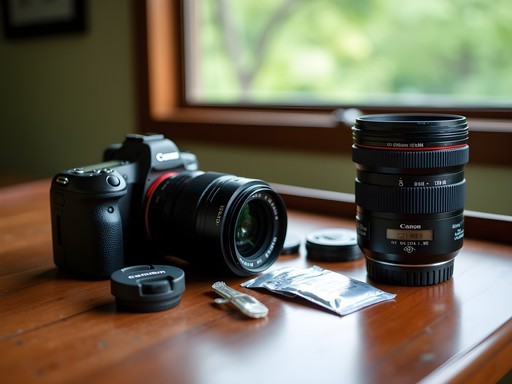
My primary camera setup consisted of my trusty Canon EOS R5 with weather sealing that proved genuinely rainforest-worthy. I paired it primarily with a 100-400mm zoom lens for wildlife work, though I occasionally switched to my 24-70mm for landscape context shots. The R5's animal eye-tracking autofocus proved invaluable when tracking lemurs through dense foliage.
Humidity is your equipment's greatest enemy here. I kept my gear in a waterproof backpack with silica gel packets, bringing only what I needed for each excursion. Every evening became a ritual of cleaning lenses and checking seals. My lens cleaning kit earned its weight in gold, as did bringing twice as many microfiber cloths as I thought necessary.
Power management required planning – Andasibe's electricity supply can be inconsistent, especially during storms. I traveled with four fully-charged camera batteries and a portable power bank for emergency charging. Memory card capacity is another consideration: RAW files from a full day's shooting added up quickly, particularly when using burst mode to capture lemur leaps or chameleon tongue strikes.

💡 Pro Tips
- Store camera gear with silica gel packets overnight to combat humidity
- Bring twice as many batteries and memory cards as you think you'll need
- A rain cover for your camera is essential, even during the 'dry' season
Finding and Photographing Lemurs: Patience and Persistence
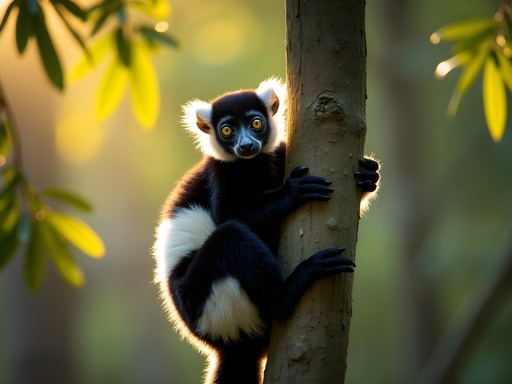
The indri – Madagascar's largest lemur – was my photographic white whale. These critically endangered primates live exclusively in eastern Madagascar's fragmented forests, with Andasibe hosting one of the most accessible populations. Yet 'accessible' is relative when discussing creatures that spend most of their lives 15-30 meters above ground in dense canopy.
The secret to successful lemur photography begins with timing. I arranged for a 5:30 AM start with my guide, Naina, who possessed an almost supernatural ability to interpret forest sounds. The indri's territorial calls typically begin around sunrise, creating a 30-minute window to locate family groups before they settle into mid-morning feeding (when they're often obscured by foliage).
Most visitors to Andasibe see lemurs, but capturing compelling images requires different strategies than simply spotting them. I learned to identify distinctive feeding trees where family groups returned regularly. Rather than chasing multiple sightings, I'd stake out promising locations, setting up my carbon fiber tripod with a fluid head for smooth panning when following movement.
Lemurs move in bursts – long periods of stillness punctuated by explosive leaps and social interactions. During those quiet moments, I'd pre-compose shots, identify clear lines of sight, and adjust my exposure for dappled light. When action erupted, I relied on burst mode (the R5's buffer depth was crucial here) and quick focus adjustments.
Beyond the iconic indri, Andasibe hosts eleven lemur species, including the ghostly white diademed sifaka and the diminutive mouse lemur (visible only on night walks). Each required different approaches – wide apertures and higher ISOs for dawn/dusk encounters, faster shutter speeds for active species, and macro capabilities for the smallest varieties.

💡 Pro Tips
- Schedule guided walks for early morning when lemurs are most active and vocal
- Use continuous autofocus and burst mode for capturing lemur leaps between trees
- Learn to predict movement patterns by watching feeding behavior
Mastering Macro: The Miniature Wonders of Andasibe
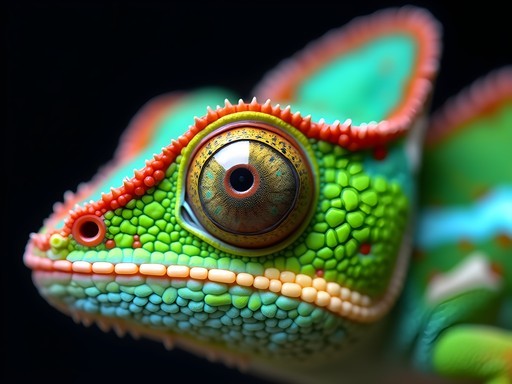
While lemurs draw most visitors to Andasibe, the true biodiversity lies in the smaller species. Madagascar hosts over 300 chameleon species – more than half the world's total – with Andasibe's Parson's chameleon among the largest at nearly 70cm long. At the other extreme, Brookesia chameleons could fit comfortably on your thumbnail.
Photographing these cryptic reptiles demands specialized techniques. After several frustrating attempts with standard lenses, I switched to a dedicated macro lens that transformed my capabilities. For the smallest subjects, I added extension tubes to increase magnification beyond the standard 1:1 ratio.
Lighting presents the greatest challenge for rainforest macro work. Andasibe's canopy creates perpetual twilight on the forest floor, while brief sun shafts create extreme contrast. I experimented with different solutions, ultimately settling on a combination of natural light supplemented by a diffused LED panel for fill light on darker subjects.
The forest floor teems with frogs that emerge after rainfall – the jewel-like mantella frogs were particular favorites, their toxic skin producing vibrant yellows, oranges and blues that pop against the leaf litter. For these subjects, I'd often use a small reflector to bounce available light rather than artificial illumination that might alter their natural behavior.
Don't overlook the invertebrates – Andasibe's giraffe-necked weevils, with their improbable anatomy, and iridescent butterflies provide endless macro opportunities. The technique that yielded my best images was simply slowing down. I'd select a promising microhabitat – a flowering plant, a rotting log, or a section of trail after rain – and observe it patiently for 30-45 minutes. The diversity that revealed itself through this deliberate approach far exceeded what I found while actively searching.

💡 Pro Tips
- Use a LED macro light with diffuser to avoid harsh shadows when photographing small subjects
- After rain is the best time to find colorful frogs and insects near trail edges
- Focus stacking techniques help achieve sharp images of tiny subjects from front to back

Navigating Andasibe's Trail Systems for Unique Perspectives
Andasibe-Mantadia National Park consists of two distinct sections: the smaller Analamazaotra Special Reserve (often called simply 'Andasibe') and the larger, more remote Mantadia National Park about 20km north. Each offers dramatically different photographic opportunities that complement each other perfectly.
Analamazaotra's well-maintained trails form relatively gentle loops through secondary forest, making it ideal for testing equipment and acclimating to rainforest conditions. The indri families here are somewhat habituated to visitors, occasionally allowing closer approaches (though never close enough to disturb them). I found the Circuit Indri 1 trail offered reliable sightings, while the longer Circuit Indri 2 accessed less-visited territories where wildlife appeared more relaxed.
Mantadia, by contrast, features primary forest with minimal infrastructure – exactly where my experience with remote monasteries proved unexpectedly valuable. The trails here demand proper hiking boots with aggressive tread, as clay soil becomes treacherously slippery even days after rainfall. My waterproof hiking boots with Gore-Tex lining kept my feet surprisingly dry despite creek crossings and mud bogs.
The photographic rewards in Mantadia justify the effort. Here I encountered the critically endangered black-and-white ruffed lemur and diademed sifaka in pristine habitat, often with no other visitors present. The Rianasoa and Tsakoka trails offered particularly productive viewpoints where forest clearings created natural light pockets.
I cannot overstate the importance of hiring knowledgeable local guides in both reserves. Beyond their tracking skills, they understand seasonal patterns – which fruiting trees attract which species, where standing water creates amphibian breeding grounds, and how weather affects wildlife behavior. My guide Naina's expertise transformed what could have been random wandering into precisely targeted photographic opportunities.
💡 Pro Tips
- Book the same guide for multiple days so they understand your photography priorities
- The Mantadia section requires more hiking but offers more pristine forest and fewer visitors
- Bring trekking poles for stability on muddy trails, especially when carrying camera equipment
Night Photography: Revealing Andasibe's Nocturnal Secrets
My most unexpected photographic discoveries happened after sunset, when Andasibe transforms into an entirely different ecosystem. Nearly 90% of Madagascar's wildlife is nocturnal – a fact I hadn't fully appreciated until my first guided night walk revealed creatures that seemed transplanted from another planet.
Technical preparation is crucial for nocturnal wildlife photography. I used a full-frame sensor camera with good high-ISO performance, typically shooting between ISO 3200-6400. A fast prime lens (f/1.8 or wider) captures more light, though the trade-off is reduced depth of field that makes focusing challenging. For smaller subjects, I found that focus stacking – taking multiple images at slightly different focus points and combining them later – produced sharper results than trying to achieve everything in one shot.
Lighting requires careful consideration. Many guides use powerful spotlights with red filters (which disturb wildlife less than white light), but these create harsh shadows and unnatural color casts. I supplemented with a subtle LED panel set to low intensity, allowing just enough fill light to reveal detail in shadowed areas without overwhelming the scene.
The stars of nocturnal Andasibe are the mouse lemurs – tiny primates with enormous reflective eyes that seem to float disembodied among the branches. Woolly lemurs and sportive lemurs also emerge after dark, moving with deliberate slowness that makes them easier to photograph than their daytime counterparts.
The chameleon experience transforms completely at night. During daylight, these reptiles display cryptic coloration to blend with surroundings. After dark, many species turn brilliant white against the vegetation, making them surprisingly easy to spot with a flashlight. Their slower nighttime movements also simplify focusing challenges.
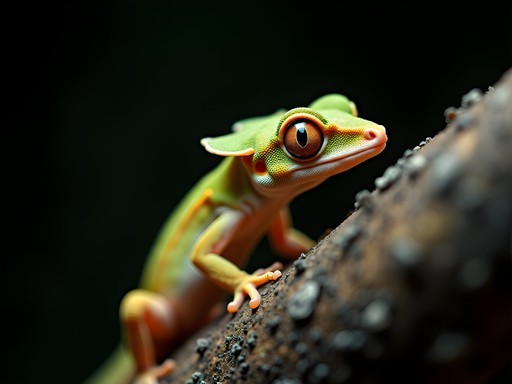
Perhaps most remarkable were the leaf-tailed geckos (Uroplatus species) that demonstrate perfect camouflage during day but reveal their true forms at night. Photographing these masters of disguise required patience and precise focusing, but resulted in some of my most otherworldly images from Madagascar.

💡 Pro Tips
- Use red-filtered headlamps to preserve your night vision between shots
- Bring a small beanbag or flexible tripod to stabilize your camera on night walks
- Focus on the eyes when photographing nocturnal lemurs – their reflective quality creates compelling focal points
Final Thoughts
As I packed my gear on the final morning, the indri's call echoed one last time across the valley – a sound that will forever transport me back to these misty forests. Andasibe taught me that wildlife photography isn't just about technical mastery or expensive equipment, but about developing relationship with place. The images I treasure most aren't necessarily the most technically perfect, but those that captured authentic moments of connection with this evolutionary island adrift in time. If you make this journey, come prepared but remain flexible. Let the forest reveal its rhythms gradually. And remember that sometimes the most powerful photographic choice is putting the camera down to fully absorb experiences no sensor could ever adequately capture. Madagascar's fragile ecosystems face mounting pressures – your images can help tell their story and perhaps contribute to their preservation. What will you discover through your lens in Andasibe?
✨ Key Takeaways
- Protect your gear from humidity with silica gel packets and proper storage
- Early morning and night walks offer the most productive wildlife photography opportunities
- Local guides are essential for finding elusive species and understanding behavior patterns
- Patience yields better results than covering maximum ground – stake out promising locations
📋 Practical Information
Best Time to Visit
April-November (dry season), with September-October optimal for wildlife activity and moderate rainfall
Budget Estimate
$2,500-3,500 for 2 weeks including accommodation, guides, and transportation
Recommended Duration
Minimum 5 days in Andasibe area, ideally 7-10 days to explore both reserves thoroughly
Difficulty Level
Moderate To Challenging, Depending On Trails Chosen And Weather Conditions


Comments
wavezone
Really inspiring photos! Thanks for sharing
Sarah Powell
Excellent breakdown of the technical challenges. I'd add that the low light conditions in the dense canopy really test your ISO limits. I found myself shooting at 3200-6400 regularly to maintain fast enough shutter speeds for the active lemurs. The newer mirrorless bodies handle it well, but it's something to consider. Also agree completely about the macro opportunities - the invertebrate diversity is staggering.
wavezone
Good point about ISO. I was shooting at 1600 minimum most of the time
explorewalker
Which trail system did you find best for photography? Planning a trip for September and trying to figure out logistics.
coolmaster
Just got back from Madagascar last month! Andasibe was the highlight of the whole trip. That indri call is something else - gave me goosebumps every single time. I used my telephoto lens and got some amazing shots of the diademed sifakas. The trails can get really slippery though, definitely bring proper hiking boots.
travelnomad
Is this good for beginner photographers?
coolmaster
Definitely! The wildlife is so accessible you'll get great shots even with a basic setup
Nicole Russell
Evelyn, this is AMAZING! I've been dying to get to Madagascar and your post just pushed it to the top of my list. The section about lens choices was super helpful - I've been debating whether my 70-200mm would be enough or if I need something longer. Sounds like the lemurs get close enough that it's perfect. Also love that you mentioned the weather challenges, I always forget to think about humidity and lens fog in rainforests!
Sarah Powell
The humidity is no joke. I'd recommend bringing plenty of silica gel packets for your camera bag.
wanderblogger
Been to Andasibe twice now and your macro section is spot on. The chameleons and leaf-tailed geckos are everywhere if you know where to look. Pro tip - hire a local guide, they spot stuff you'd walk right past. Also the night walks are absolutely worth it, saw so many more critters after dark than during the day.
explorewalker
How much do the guides usually charge?
wanderblogger
Around 40-50k ariary for a half day when I went in 2024. Worth every penny honestly
luckyfan
WOW those indri photos are incredible!! Adding this to my bucket list right now
wildmate
Planning a trip there in August - is that a good time for photography? Did you have any issues with rain? Also wondering what focal length you found most useful for the lemurs?
Evelyn Rogers
August is great! It's dry season so less rain to worry about. I used a 100-400mm lens most often for lemurs - they can be high up in the canopy. But don't forget a good mid-range zoom (24-70mm) for when they come closer on some of the more habituated trails. The sifakas sometimes approach quite near!
wildmate
Perfect, thanks! Just what I needed to know for my packing list.
Megan Martin
Fantastic post, Evelyn! I was in Andasibe last year documenting for a conservation project, and your tips on macro photography are spot on. The biodiversity there is mind-blowing. I found my telephoto lens essential for capturing lemurs high in the canopy without disturbing them. One tip for future travelers: bring silica gel packets for your camera gear. The humidity there is brutal on electronics, especially during the rainy season. Did you explore any of the night walks? The nocturnal species were a whole different photography challenge!
Evelyn Rogers
Thanks Megan! Great tip on the silica gel - I went through so many packets keeping my gear dry. And yes, I did two night walks! The mouse lemurs were incredibly difficult to photograph, but spotting chameleons sleeping on branches was fascinating. What conservation project were you working with?
Megan Martin
I was documenting habitat restoration with the Mitsinjo Association. They're doing amazing work expanding the protected forest corridors. Those mouse lemurs are so quick! I got mostly blurry shots despite my best efforts.
Venture X
Premium card with 2X miles, $300 travel credit, Priority Pass