


Disclosure: This article contains affiliate links. We may earn a commission from purchases at no extra cost to you, which helps our travel content.
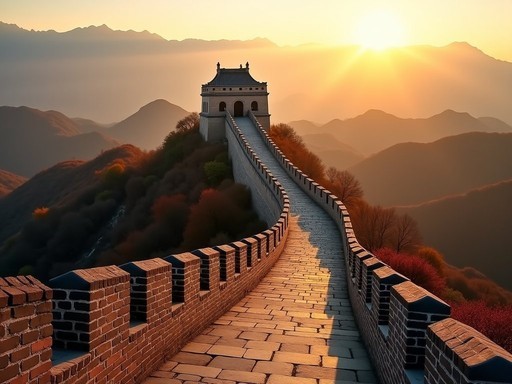
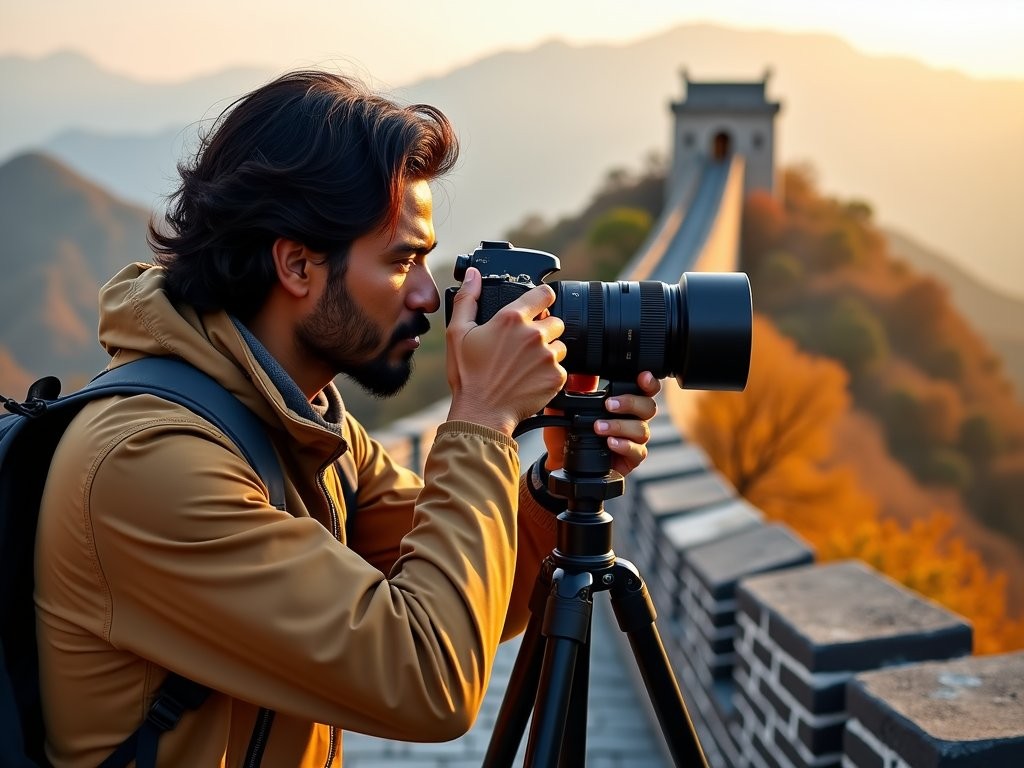
The first time I stood atop the Badaling section of the Great Wall, my camera dangling from my neck and the autumn breeze gently tousling my hair, I felt a profound sense of smallness against the backdrop of history. As someone who has spent years documenting my cross-continental journeys from Brazil to Japan and beyond, I can confidently say that few landmarks offer the photographic potential of this ancient fortification. The serpentine structure winding through mountains ablaze with fall colors creates a photographer's playground of textures, perspectives, and historical gravitas. Having visited during different seasons over the years, I've developed a particular fondness for autumn at Badaling—when tourist crowds thin slightly and the light takes on that magical golden quality that transforms even amateur snapshots into works of art. In this guide, I'll share everything I've learned about capturing the essence of this UNESCO World Heritage site through my lens, from technical settings to the cultural nuances that will elevate your photography beyond mere tourist shots.

Planning Your Photographic Expedition
Before we dive into camera settings and composition techniques, let's talk strategy. Badaling is the most visited section of the Great Wall for good reason—it's magnificently restored, easily accessible from Beijing (just 70km northwest), and offers some of the most dramatic vistas of the wall's undulating path through the mountains.
As a photographer who values both the perfect shot and the experience behind it, I recommend allocating at least a full day for your Badaling expedition. Arriving before sunrise will reward you with two gifts: the soft, directional light that photographers chase worldwide and—perhaps more importantly in this popular spot—relative solitude.
My most successful visit began with a 4:30 AM departure from Beijing, arriving at Badaling around 5:45 AM, well before the official 6:30 AM opening time during peak season. This early arrival allowed me to secure parking and position myself for entry. By 7:30 AM, I was capturing pristine, people-free shots of the wall bathed in golden morning light.
For transportation, you have several options. While public buses (877 from Deshengmen or S2 train from Huangtudian Railway Station) are economical, they don't align with pre-dawn arrival plans. For serious photography, I recommend either hiring a private driver (expect to pay 600-800 yuan for a full day) or joining a photography-specific tour that caters to early access needs. The flexibility of having a driver wait while you shoot until perfect light conditions cannot be overstated.
As for entrance tickets, purchase them online a day in advance to avoid morning queues. The Badaling Great Wall official WeChat account offers e-tickets that can be scanned directly at the entrance, saving precious morning minutes when light conditions are changing rapidly.

💡 Pro Tips
- Book accommodation in Yanqing district the night before for the shortest morning commute to Badaling
- Download Baidu Maps as Google Maps doesn't function well in China
- Bring your passport for ticket purchase and potential random ID checks
Essential Photography Gear for the Wall
My engineering background has taught me that the right tools make all the difference, and this is especially true when photographing a subject as vast and varied as the Great Wall. After multiple visits to Badaling, I've refined my gear list to balance comprehensive coverage with practical mobility.
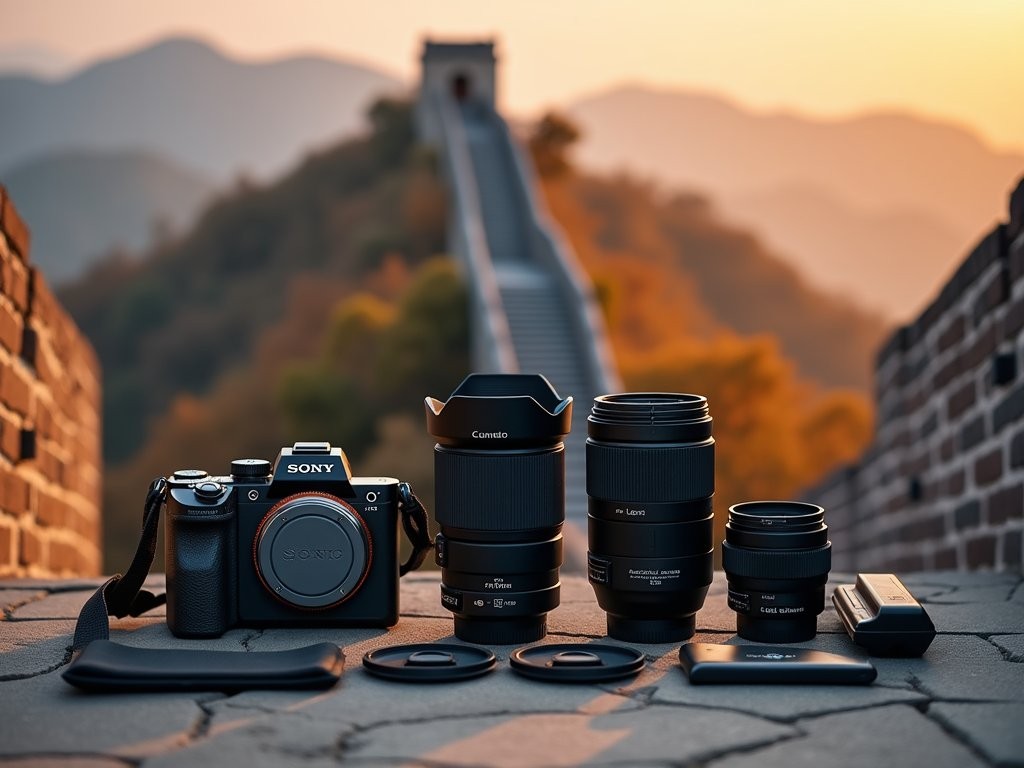
First and foremost, a versatile camera body that performs well in varying light conditions is essential. I currently shoot with a mirrorless camera for its exceptional dynamic range—crucial for handling the harsh contrasts between shadowed wall sections and bright skies. The lightweight body also makes a significant difference when you're climbing the wall's steeper sections, where every gram counts.
For lenses, I pack a holy trinity that covers virtually every scenario Badaling presents:
- A wide-angle lens (16-35mm) for sweeping vistas and architectural details
- A standard zoom (24-70mm) for versatile everyday shooting
- A telephoto lens (70-200mm) for compressing distant wall sections and mountains
Of these, my telephoto zoom lens often produces the most striking images, as it compresses the wall's undulating path against the mountainous backdrop, creating that iconic serpentine effect that defines Great Wall photography.
A sturdy tripod is non-negotiable, particularly for golden hour and blue hour shooting. Badaling's stone surfaces and unpredictable winds demand stability. I've found that a carbon fiber tripod offers the ideal balance between sturdiness and portability—essential when you're covering significant distances on foot.
Filters are my secret weapon at Badaling. A polarizer cuts glare and enhances the autumn foliage colors, while graduated ND filters help balance the bright sky with darker foreground elements. For long exposures of moving clouds over the wall (particularly effective on partially cloudy days), a standard ND filter is invaluable.
Finally, don't underestimate the importance of a comfortable camera bag with good weight distribution. The Badaling section involves significant climbing, and a poorly packed bag will quickly become your enemy. I organize my gear in a backpack with quick side access, allowing me to change lenses without removing the bag entirely—a small but significant time-saver when chasing changing light conditions.
💡 Pro Tips
- Bring twice as many batteries as you think you'll need—cold mountain air drains them faster
- Pack lens cleaning supplies, as Badaling can be dusty, especially on windy days
- A remote shutter release eliminates vibration for those critical golden hour long exposures
Prime Photography Locations at Badaling
Badaling stretches approximately 7.5 kilometers, with 12 watchtowers distributed across its northern and southern sections. After multiple visits and countless frames, I've identified several locations that consistently yield exceptional photographs, each offering a distinct perspective on this architectural marvel.
North Line (Towers 1-8): The Photographer's Favorite
The North Line ascends steeply and receives fewer visitors, making it my preferred shooting location. The dramatic elevation changes create compelling compositional opportunities that showcase the wall's relationship with the surrounding landscape.
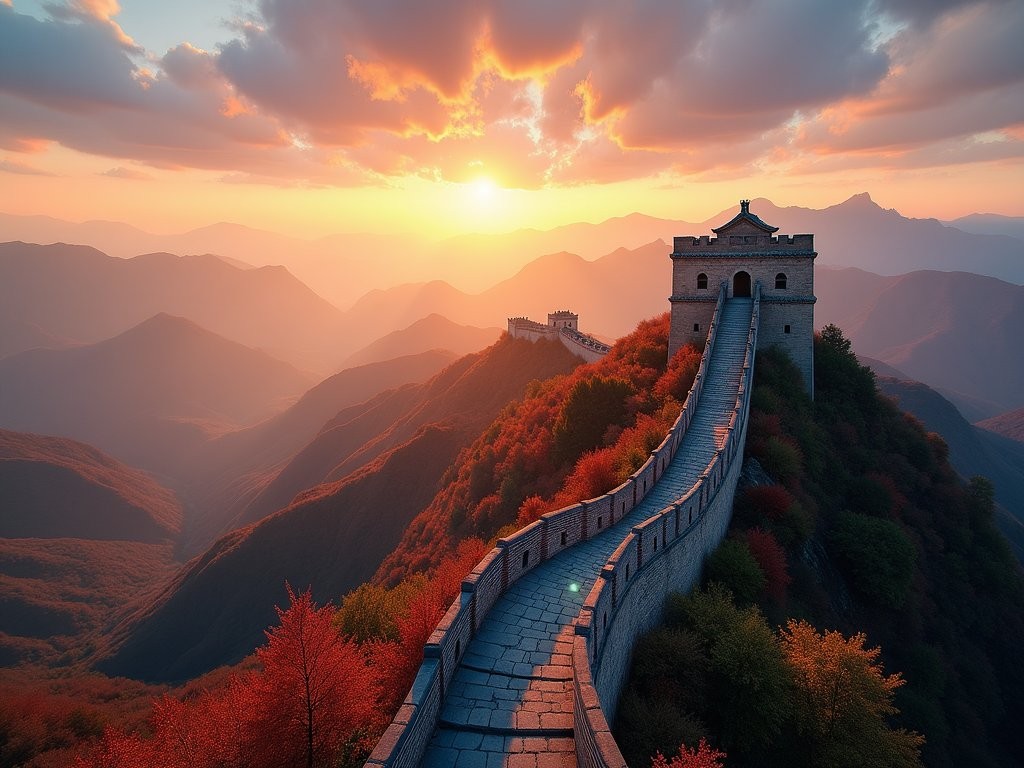
North 8th Tower (Bei Ba Lou): This is the pinnacle of Badaling photography—literally and figuratively. At 1,015 meters above sea level, this watchtower offers a breathtaking 360-degree panorama. Arriving here for sunrise provides two distinct shooting opportunities: first, capturing the wall illuminated by golden light with mountains still shrouded in morning mist; second, shooting back toward the sunrise, using the wall as a leading line toward the illuminated horizon.
North 4th Tower: This location provides my favorite midday shooting spot. The wall here forms a perfect 'S' curve that creates a compelling composition regardless of season. In autumn, the contrast between the gray stonework and the red-gold foliage is particularly striking. I often spend an hour here waiting for clouds to create dynamic shadow patterns across the landscape.
South Line (Towers 1-4): Accessibility and Architecture
The South Line is less steep and more heavily restored, making it more accessible but also more crowded. However, it offers excellent opportunities for architectural detail photography and human interest shots.
South 1st Tower: The iconic entrance view that most visitors photograph first. Rather than dismissing this as too 'touristy,' I embrace it as an opportunity to capture the grand scale of the wall stretching into the distance. Early morning or late afternoon light creates dramatic shadows across the stone steps that add depth and dimension.
Bear Garden (Xiong Yichang): Located near the South 4th Tower, this often-overlooked spot offers unique compositions featuring ancient gnarled trees in the foreground with the wall as a backdrop. During autumn, the contrast between the vibrant foliage and ancient stonework creates images with remarkable depth and texture.
Beyond the Wall: Contextual Perspectives
Some of my most compelling Badaling photographs actually incorporate elements beyond the wall itself. The Shuiguan Great Wall section, visible from certain vantage points at Badaling, offers opportunities for comparative compositions showing multiple wall sections winding through the landscape.
The surrounding Jundu Mountains also provide context that elevates your photography from simple documentation to storytelling. I particularly recommend hiking about 20 minutes east of the North 8th Tower along a marked trail to find a natural rock outcropping that frames the wall against the broader mountain landscape.
💡 Pro Tips
- Scout your locations the day before if possible to plan compositions in advance
- The North Line offers better lighting conditions in the morning, while the South Line photographs better in late afternoon
- Use human elements selectively—a single figure on a distant section can provide scale without overwhelming the composition

Mastering Light and Timing at Badaling
If there's one lesson my engineering background taught me that translates perfectly to photography, it's that timing is everything. At Badaling, understanding the interplay of light, seasons, and weather conditions can transform an ordinary snapshot into a compelling visual narrative.
The Golden Hours: Worth Every Early Alarm
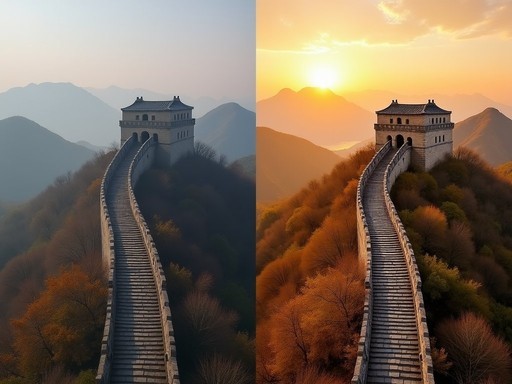
The first and last hours of daylight at Badaling offer magical lighting conditions that simply cannot be replicated. During autumn, sunrise occurs between 6:30-7:00 AM, while sunset happens around 5:30-6:00 PM. I always aim to be in position at least 30 minutes before these events to capture the rapidly changing light.
Morning light at Badaling has a distinctive quality—crisp and directional, with long shadows that accentuate the wall's texture and the undulating terrain. The eastern exposure of many wall sections means they catch this light perfectly, creating a warm glow on the ancient stonework.
Evening light bathes the western-facing sections in a rich amber hue that softens the harsh stone textures. This is particularly effective for creating silhouettes of the watchtowers against the setting sun.
Weather Patterns and Atmospheric Effects
Clear autumn days provide reliable shooting conditions, but don't dismiss partially cloudy days. Some of my most dramatic images feature sunbeams breaking through cloud cover to spotlight specific wall sections against shadowed mountains.
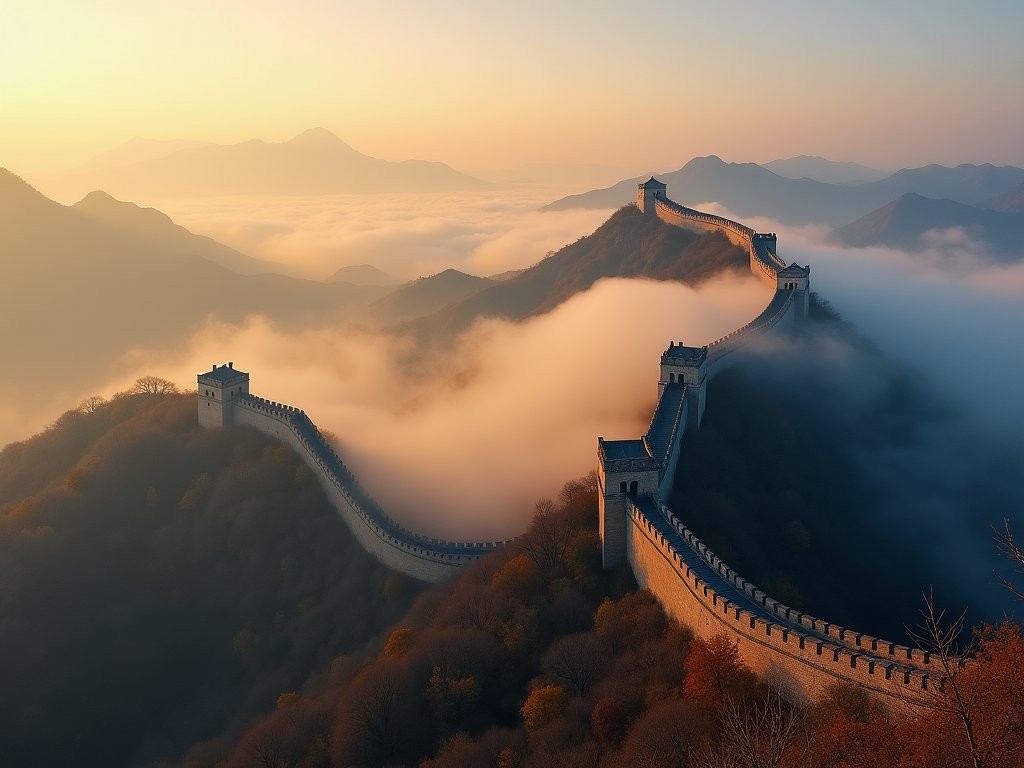
Morning mist is common in the valleys surrounding Badaling during fall, creating ethereal conditions where portions of the wall appear to float above clouds. These conditions are unpredictable but most common after rainfall or on mornings following a significant temperature drop overnight.
Wind patterns affect your shooting strategy as well. Calm mornings are ideal for capturing reflections in the small lakes near the Bear Garden, while windy days create dramatic cloud movements perfect for long exposures. I use my weather app religiously the day before and morning of my shoots to anticipate these conditions.
The Seasonal Transformation
While Badaling is photogenic year-round, autumn (mid-October to early November) offers a photographer's perfect storm of conditions: comfortable temperatures for long shooting sessions, dramatically reduced haze compared to summer, vibrant foliage providing color contrast against the gray stonework, and fewer tourists compared to peak summer months.
The foliage progression is worth tracking. Early autumn brings subtle yellow tones to the landscape, mid-season introduces rich reds and oranges, and late autumn offers stark, graphic compositions as trees shed their leaves, revealing the wall's structural relationship with the mountain ridges.
Crowd Management Strategies
Badaling receives up to 70,000 visitors daily during peak periods. For photographers seeking clean compositions without modern visitors, timing becomes crucial. My time-tested approach involves:
- Arriving at first light (at least 30 minutes before official opening)
- Immediately hiking to the furthest point of my intended route
- Working my way backward toward the entrance as crowds begin to build
Alternatively, late afternoon (after 4:00 PM) sees dramatically reduced crowds as tour groups depart. The quality of light combined with the relative tranquility makes this my preferred shooting time if I can only visit once during the day.
💡 Pro Tips
- Use a graduated ND filter to balance exposure between bright sky and shadowed wall sections during golden hour
- Track the sun's position with PhotoPills or similar apps to plan precise shooting locations days in advance
- On hazy days, use a circular polarizer to cut atmospheric haze and enhance the blue sky contrast
Creative Composition Techniques
Photographing an icon as frequently captured as the Great Wall presents a creative challenge: how do you create fresh perspectives on one of the world's most photographed structures? Over my multiple visits to Badaling, I've developed several composition approaches that help my images stand apart from standard tourist snapshots.
Leading Lines and the Rule of Thirds
The Great Wall is essentially one magnificent leading line, but the art lies in how you incorporate this into your composition. Rather than placing the wall centrally in your frame, experiment with positioning it along the lower or upper third. This creates visual tension and draws the viewer's eye through the image.
I often compose with the wall beginning in a lower corner of the frame, leading diagonally toward a prominent watchtower positioned at a power point (the intersection of rule-of-thirds grid lines). This creates dynamic movement through the image while maintaining compositional balance.
Framing Within the Frame
The watchtowers and archways of Badaling provide perfect natural frames. Position yourself inside a watchtower and shoot through the window or archway to frame a distant section of wall. This technique creates depth and context while highlighting the architectural details of the watchtowers themselves.
For a more subtle approach, use environmental elements like tree branches or rock formations to partially frame sections of the wall. During autumn, the colorful foliage creates particularly effective natural frames that add seasonal context.
Scale and Human Elements
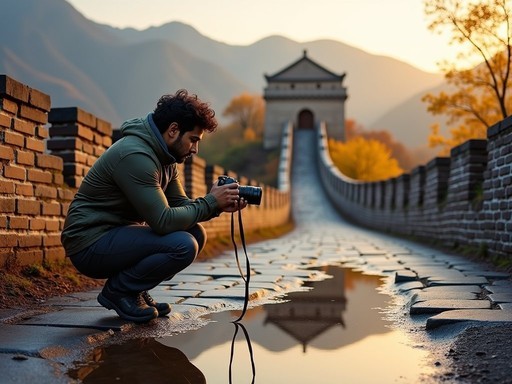
The true magnitude of the Great Wall is difficult to convey without reference points. Including human figures—ideally positioned at a distance rather than dominating the foreground—instantly communicates scale. I often wait patiently for visitors wearing vibrant clothing to reach specific points along the wall that complement my composition.
Alternatively, I use my travel tripod to capture self-portraits that serve the same purpose. By setting up a composition, then using a remote trigger to capture myself walking a specific section, I create images that both demonstrate scale and tell the story of exploration.
Abstraction and Details
While grand vistas are compelling, don't overlook the intimate details that tell the wall's story. The weathered stones, ancient graffiti (some dating back centuries), and architectural details reward close inspection with a macro or standard lens.
I particularly enjoy creating abstract compositions focusing on the textural contrast between the wall's stonework and natural elements—moss growing between stones, the interplay of shadow patterns across steps, or the geometric patterns of watchtower brickwork.
Reflections and Mirror Images
After rainfall or morning dew, look for puddles on stone surfaces that create reflection opportunities. These temporary mirrors can transform mundane sections into compelling compositions, particularly when they reflect watchtowers or dramatic skies.
Similarly, the small lakes near the Bear Garden area occasionally offer perfect reflection conditions on still mornings. Positioning these reflections in the foreground with the actual wall rising behind creates images with wonderful symmetry and depth.
Perspective Play
Experiment with extreme perspectives to create unique interpretations. Get extremely low to the ground to emphasize the texture of ancient stones in your foreground, or find elevated positions that reveal the wall's relationship with the broader landscape.
One technique I've found particularly effective is to use a telephoto lens to compress distant sections of the wall against each other, creating a layered effect that emphasizes the wall's serpentine path through multiple mountain ridges.

💡 Pro Tips
- Look for complementary colors—the gray stone against autumn's red and gold foliage creates naturally harmonious compositions
- Use the watchtowers as punctuation marks in your compositions, drawing the eye to these natural focal points
- Embrace negative space, particularly when mist or clear skies create minimalist opportunities
Post-Processing for Impactful Wall Photography
As a software engineer who spends hours optimizing code, I approach post-processing my Great Wall photographs with the same attention to detail—enhancing what's already there without overdoing effects that would compromise authenticity. The goal is to help viewers feel what I experienced standing on those ancient stones.
Color Calibration for Authentic Representation
Badaling's stonework has subtle color variations that tell the story of its age and construction. I begin my editing workflow by carefully calibrating white balance to maintain these authentic tones. The wall's weathered stones range from warm gray to cool bluish-gray depending on light conditions, and preserving this subtlety prevents the artificial look that plagues many over-processed landscape images.
For autumn foliage, I enhance vibrance rather than saturation to bring out the natural colors without making them appear artificially intense. The goal is to recreate what the human eye perceives—which often has more dynamic range than a camera sensor can capture in a single exposure.
Dynamic Range Recovery
The contrast between bright skies and shadowed wall sections often exceeds what even the best camera sensors can capture. I routinely bracket exposures (taking multiple shots at different exposure values) when shooting in high-contrast conditions. In post-processing, I blend these exposures using luminosity masks to create natural-looking results that maintain detail in both highlights and shadows.
For single exposures, I use the editing software to selectively recover shadow and highlight detail. The key is subtlety—pushing recovery too far results in flat, unnatural images that lack the dramatic light that makes Great Wall photography so compelling.
Perspective Correction and Composition Refinement
When photographing architecture as massive as the Great Wall, perspective distortion is inevitable. I use Lightroom's transform tools to subtly correct converging lines when they distract from the composition, while maintaining enough perspective to convey the wall's imposing scale.
Cropping is another powerful tool in my post-processing workflow. While I strive to compose carefully in-camera, sometimes removing distracting elements at the edges or slightly adjusting the aspect ratio can dramatically strengthen a composition.
Atmospheric Enhancement
The misty conditions that sometimes occur at Badaling create atmospheric depth that I enhance through targeted adjustments to clarity and dehaze tools. Reducing clarity slightly in distant mountain ranges while maintaining sharpness in the wall itself enhances the natural atmospheric perspective.
For images captured during hazy conditions (common in northern China), I selectively apply the dehaze tool to reveal distant details without creating an artificially clear appearance that wouldn't match the actual viewing experience.
Creative Interpretations Through Editing
While I prioritize authentic representation, certain images benefit from more creative interpretation. Black and white conversions, for instance, can transform images captured during flat midday light into dramatic studies of texture and form. The Great Wall's geometric patterns and strong lines lend themselves particularly well to monochrome treatment.
For sunrise and sunset images, I sometimes enhance the warm tones to recreate the emotional impact of those golden moments. The key is maintaining a connection to reality—enhancing what was present rather than creating effects that weren't there.
Cultural Sensitivity in Editing
As someone who navigates multiple cultural identities daily, I'm particularly conscious of representing cultural heritage sites with respect. This extends to editing choices—avoiding treatments that might sensationalize or exoticize the Great Wall, instead focusing on edits that highlight its historical significance and architectural achievement.

💡 Pro Tips
- Create a custom preset for your Great Wall images to maintain consistency across your portfolio
- Use radial filters to subtly direct attention to focal points like watchtowers without obvious vignetting
- When editing images with people, maintain natural skin tones as a reference point for overall color accuracy
Final Thoughts
As I pack away my camera after a final sunset session at Badaling, watching the ancient stones glow amber in the fading light, I'm reminded that great photography is about more than technical perfection—it's about connecting with the soul of a place. The Great Wall has stood for centuries as a testament to human determination, and capturing its essence requires both technical skill and cultural appreciation. Whether you're wielding a professional camera setup or simply your smartphone, the techniques and perspectives shared in this guide will help you create images that go beyond documentation to tell the story of this remarkable structure. As we preserve these moments through our lenses, we participate in the ongoing cultural dialogue between past and present, between East and West, between human achievement and natural beauty. I hope your photographic journey along the Badaling section brings you the same sense of wonder and connection that it has brought me across multiple visits. 直到下次相见 (Until we meet again)—may your memory cards return full and your spirit fuller.
✨ Key Takeaways
- Timing is crucial: arrive before sunrise or stay after sunset for optimal light and fewer crowds
- The North Line offers more dramatic landscapes and fewer tourists than the South Line
- Use a telephoto lens to compress distant wall sections against mountain backdrops for iconic compositions
- Autumn provides the perfect combination of comfortable temperatures, reduced haze, and colorful foliage
📋 Practical Information
Best Time to Visit
Mid-October to early November (autumn)
Budget Estimate
¥600-1000/day including transportation, entrance fees, and meals
Recommended Duration
Full day (minimum); two days ideal for varied lighting conditions
Difficulty Level
Moderate (Significant Elevation Changes And Many Stairs)
Comments
Timothy Jenkins
Brilliant guide, Marco. I visited Badaling last spring and completely agree about the golden hour lighting. One tip I'd add: if you're serious about photography, consider visiting on a weekday rather than weekend. The difference in crowd density is remarkable. I managed to get some wonderfully isolated shots of the watchtowers around 7am on a Tuesday. The cable car opens early which helps position yourself before the tour buses arrive. Also found that a polarizing filter really helped with the haze that's common in that region.
sunsetclimber
weekday tip is gold, thanks!
escapeperson2605
Amazing photos!! Going in November, so excited now!
Marco Sharma
November is perfect! The autumn colors should still be beautiful and crowds are lighter. Enjoy!
dreamlover
those sunset shots are gorgeous!!
starhero
what about winter? is it still good for photos or too cold?
sunsetmaster2562
Winter can be amazing actually. Way fewer people and sometimes you get snow on the wall which looks incredible. Just bundle up and watch for ice on the steps
Taylor Moreau
Excellent guide, Marco. I've taken several business clients to Badaling for corporate photography sessions, and your advice on the prime locations is accurate. One additional consideration: if you're on a tight schedule, the cable car can save significant time and energy, allowing you to focus on photography rather than the climb. Also worth noting that weekdays are considerably less congested than weekends. The section about lens selection is particularly helpful - I always bring my wide-angle lens for those dramatic wall perspectives.
Bella Johansson
Marco, this brings back wonderful memories! I visited Badaling back in 2019 on a shoestring budget and managed to capture some stunning shots with just my old point-and-shoot. One tip I'd add for budget travelers: the S2 bus from Deshengmen is incredibly cheap (around 12 yuan) and drops you right at the entrance. I met a lovely Chinese grandmother on that bus who shared her homemade baozi with me - sometimes the journey is just as memorable as the destination itself. Your section on golden hour timing is spot on. That amber glow you described is absolutely magical.
starhero
thanks for the bus tip! way cheaper than the tour groups
luckymate1522
This is EXACTLY what I needed!! Saved for my trip in May!!!
dreamlover
how crowded does it get?? thinking about going but worried about too many tourists
Marco Sharma
It can get very busy, especially mid-morning to afternoon. I'd recommend arriving right when it opens at 6:30am or going for sunset. The crowds thin out considerably and the light is much better for photos anyway!
sunsetmaster2562
Yeah the early morning thing is legit. I went around 7am last spring and had whole sections almost to myself for like 45 mins. Totally worth the early wake up
Jean Wells
Having photographed the Great Wall across multiple seasons over 15 years, I appreciate the depth of this guide. The Badaling section certainly presents unique challenges with its popularity. I've found that the light between 4-5pm in autumn creates dramatic shadows across the battlements that tell a compelling visual story of the wall's purpose. One aspect not mentioned: bring a polarizing filter to manage the harsh reflections off stone on sunny days. The contrasts between the ancient wall textures and the surrounding landscape demand careful exposure balancing. For those serious about Great Wall photography, I recommend exploring beyond Badaling to Mutianyu and Jinshanling for comparative architectural features and significantly different photographic opportunities.
Marco Sharma
Jean, your expertise shines through! Excellent point about the polarizer - I should have emphasized that more. And yes, I'm working on guides for Jinshanling and Simatai for next month. The photographic differences between sections are fascinating.
Claire Hawkins
Reading this brought back so many memories! When we visited Badaling with our kids last year, I was worried about getting decent photos while managing two energetic children. Your tip about the North 7th watchtower being less crowded was a lifesaver - we spent almost an hour there while the kids explored and I got some peaceful shooting time. The morning light hitting the ancient stones created this gorgeous texture that made even simple compositions look dramatic. For families reading this, we found taking the cable car up and walking down was perfect - saved everyone's energy for exploring rather than climbing, and still got amazing photos along the way!
dreamqueen
Thanks for the family tip Claire! Did you find it easy to use the cable car with kids? Any issues with lines?
Claire Hawkins
The lines weren't bad in the morning, but got much longer by noon. Kids loved the ride! Just keep a close eye on little ones during boarding - it doesn't slow down much.
Venture X
Premium card with 2X miles, $300 travel credit, Priority Pass