


Disclosure: This article contains affiliate links. We may earn a commission from purchases at no extra cost to you, which helps our travel content.
The first time I laid eyes on Bolivia's Salar de Uyuni, I felt like I'd driven my truck right off the edge of the Earth. After two decades behind the wheel crossing North America's diverse landscapes, I thought I'd seen it all – until I found myself standing on what looked like an endless white canvas stretching to the horizon. This surreal 4,086 square mile salt flat isn't just the world's largest; it's nature's perfect photography studio. The blindingly white salt crust creates an optical playground where perspective bends to your creative will. Last year, I spent a week with my camera, a backpack, and an open mind exploring this otherworldly landscape, learning exactly how to capture those mind-bending perspective shots that make friends back home scratch their heads and ask, 'How the hell did you do that?' This isn't your standard tourist trap photography guide – this is road-tested advice from someone who's made every mistake so you don't have to.
Understanding the Salt Flats' Photographic Magic
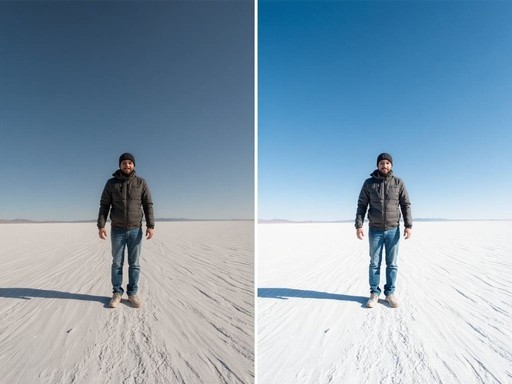
What makes Salar de Uyuni a photographer's paradise isn't fancy equipment or technical wizardry – it's simple physics and a whole lot of salt. During the dry season (April through November), the ancient lake bed transforms into a cracked white expanse so flat and featureless that it essentially erases your sense of depth perception. The salt surface stretches with almost zero elevation change for miles, creating a natural infinity backdrop that photographers usually need expensive studios to replicate.
The science behind those mind-bending perspective shots is surprisingly simple: without visual reference points like trees, buildings, or terrain changes, your brain can't accurately judge how far away objects are from each other. This creates the perfect conditions for forced perspective photography – the same technique that makes tourists appear to hold up the Leaning Tower of Pisa, except here, the canvas is virtually limitless.
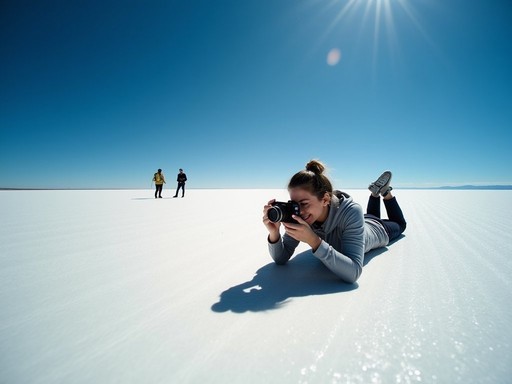
I learned this lesson the hard way my first morning on the flats. Setting up what I thought would be a quick shot of my travel buddy appearing to stand on my outstretched palm turned into a 45-minute exercise in shouted directions: "No, move back more! More! I can still see your feet touching the ground!" The vast emptiness plays tricks on your spatial awareness, making distances nearly impossible to gauge without practice.
What separates amateur perspective shots from ones that'll make your Instagram followers do a double-take is understanding that the camera needs to be positioned low – really low. I found myself practically lying flat on the salt, my trusty camera bean bag keeping my gear safe from the corrosive salt surface. The lower your camera angle, the more convincing the illusion becomes.
During my week there, I watched countless tourists attempt these shots only to wonder why their results looked off. The secret isn't just in the positioning – it's in embracing the disorienting vastness and letting it reset everything you think you know about capturing scale in your photographs.

💡 Pro Tips
- Position your camera as low to the ground as possible for the most convincing perspective illusions
- Bring a small prop (like a toy dinosaur or action figure) to create dramatic scale effects with minimal effort
- Use a wide-angle lens to emphasize the vastness but switch to a telephoto for compression effects that enhance perspective illusions
Essential Gear for Salt Flat Photography
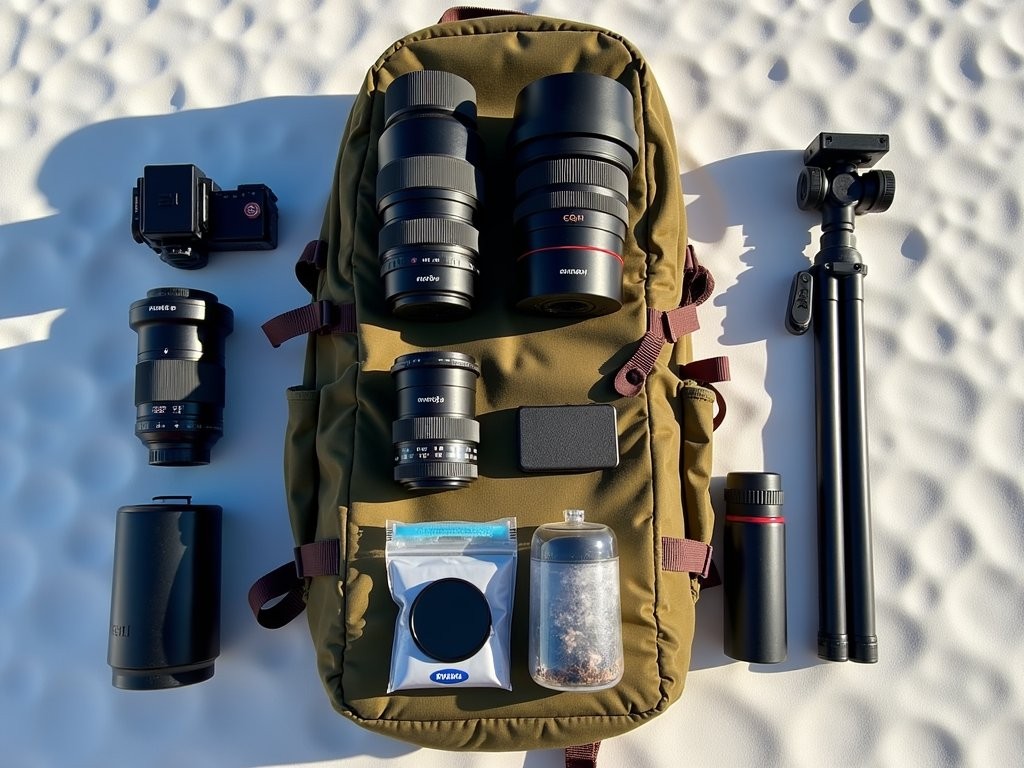
When you're 12,000 feet above sea level on a blindingly white salt desert, gear preparation isn't just about getting good shots – it's about survival. After years on the road, I've learned to pack smart, not heavy, especially when backpacking through remote locations like Salar de Uyuni.
First things first: protect your camera. The salt is merciless on equipment, working its way into every crevice and potentially causing serious damage. I wrap my camera body in a weatherproof sleeve when not shooting, and I'm religious about cleaning contacts and changing lenses inside a makeshift shelter (usually just my jacket creating a small tent).
For lenses, I brought three workhorses: a wide-angle (16-35mm) for capturing the vastness, a standard zoom (24-70mm) for flexibility, and a telephoto (70-200mm) for compression effects that make perspective illusions even more dramatic. If you can only bring one, make it a versatile zoom like a 24-105mm.
A sturdy tripod is non-negotiable, but here's where most tourists go wrong – they bring massive tripods that are unwieldy and hard to position at the ultra-low angles needed for perspective shots. I use a compact travel tripod with legs that can splay completely flat, allowing me to get the camera literally inches from the salt surface.
Props make or break perspective photography on the salt flats. While tour guides carry the standard toys (plastic dinosaurs, Pringles cans), I recommend bringing your own unique items. Some of my best shots came from random objects I found in my truck's glove compartment – a miniature bottle of bourbon from a distillery tour, my son's old action figure, even my weathered trucker cap created stories within the frame.
Don't forget practical essentials: sunscreen with SPF 50+ (the sun reflects off the white surface with brutal intensity), a wide-brimmed hat, polarizing filters for your lenses, and more water than you think you'll need. I learned the hard way that altitude dehydration is no joke when I got so focused on getting the perfect sunset shot that I forgot to drink for hours. Woke up the next morning feeling like I'd been on a three-day bender without the fun memories to show for it.
One unexpected item that saved countless shots: a small handheld mirror. When shooting solo, I used it to check compositions without running back and forth between camera and subject position. Twenty years of trucking taught me that improvisation is often the difference between making it work and missing the shot entirely.
💡 Pro Tips
- Bring ziplock bags to protect your gear from salt damage when not in use
- Pack a small pocket mirror to check compositions when shooting solo
- Use a polarizing filter to control glare and enhance the blue sky contrast against the white salt
Creative Perspective Shot Ideas Beyond the Basics
After you've nailed the obligatory "tiny person standing on a beer can" shot (we all do it), it's time to push your creative boundaries. The salt flats offer possibilities limited only by your imagination, and after spending countless hours experimenting, I've developed some perspective techniques that go beyond the tourist standards.
The Floating Horizon Line One of my favorite techniques involves creating the illusion that your subject is floating between earth and sky. Position your model lying down with their back on the salt, then shoot from a low angle so the horizon line appears to cut through their body. With proper execution, it looks like they're suspended in mid-air, half-submerged in the sky's reflection. This works best during the rainy season when there's a thin layer of water creating mirror reflections, but you can simulate it during dry season by carefully positioning your subject relative to the horizon.
Shadow Play The harsh midday sun that photographers usually avoid becomes your ally on the salt flats. Around noon, when shadows are most defined, try capturing your subject interacting with their own shadow in impossible ways – stepping on it, holding it, or appearing to lift it off the ground. The stark white background makes shadows incredibly crisp, creating surreal results that need minimal editing.
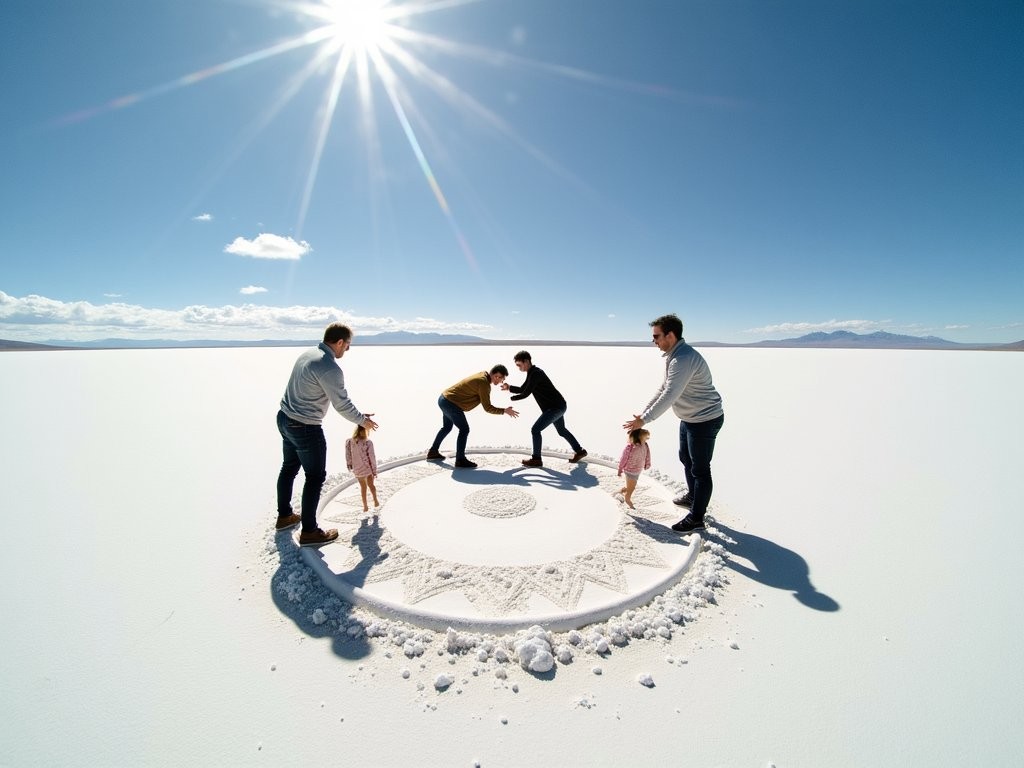
The Infinite Loop This one requires planning but creates mind-bending results. Position several people in a circle, each appearing to interact with the next person in an impossible way (holding them in their palm, stepping on their head, etc.). When shot from above using my drone, it creates an Escher-like loop of impossible perspective that stops viewers in their tracks.
Playing With Scale Progression One morning, I convinced three fellow travelers to help create a shot showing human evolution across the salt flats. We positioned ourselves at carefully calculated distances so that when photographed from a low angle, it appeared as though we were growing from tiny to giant across the frame. The key was maintaining exact positioning relative to the camera while increasing distance logarithmically (not linearly) between subjects.
Liquid Containers Bring empty, transparent bottles or cups and position them so they appear to pour liquid (water, beer, coffee) onto or into your distant subject. With the right angle, it looks like you're drowning your friend in a teacup or filling them up like a human container. These shots require precision but consistently get the biggest reactions.
The real magic happens when you start combining these techniques or inventing your own. After decades of appreciating landscapes from behind a truck windshield, there's something liberating about manipulating reality through your viewfinder, creating impossible scenes that exist nowhere else but in your imagination and, eventually, your memory card.
💡 Pro Tips
- Try shooting during 'blue hour' (just before sunrise/after sunset) when the soft light creates a dreamy quality perfect for surreal perspective shots
- Use a walkie-talkie or phone call to direct distant subjects precisely when shooting complex perspective setups
- Create a simple measuring system (like counting steps) to replicate successful distance ratios for different shot types

Timing Your Shoot: The Light Factor
If there's one thing my years on the road have taught me, it's that timing is everything – whether you're trying to beat traffic through Chicago or capture the perfect light on Bolivia's salt flats. The quality of light on Salar de Uyuni doesn't just affect your photos; it transforms the entire landscape from one hour to the next.
Most tourists arrive mid-morning and leave by mid-afternoon, which means they're shooting in the worst possible light. The harsh midday sun creates extreme contrast, washes out colors, and makes the white salt blindingly reflective. After two decades of watching the American landscape change through my truck windshield at different hours, I knew better than to waste the golden hours.
The Magic of Dawn I forced myself out of my sleeping bag at 4:30 AM every morning to catch first light, despite the bone-chilling cold (temperatures often drop below freezing at night, even when days are warm). The pre-dawn blue hour (about 30-45 minutes before actual sunrise) bathes the salt in an ethereal blue glow that adds mystery to perspective shots. As the sun crests the distant Tunupa Volcano, you get approximately 20 minutes of perfect golden light with soft shadows that add definition to the salt polygons without harsh contrast.
During one memorable sunrise, I captured a series of self-portraits using my wireless camera remote that made it appear as though I was holding the rising sun between my fingers. The soft orange glow created natural rim lighting around my silhouette that no amount of Photoshop could replicate.
The Midday Challenge Rather than hiding from the harsh midday sun (11 AM to 2 PM), I learned to use it strategically. This is actually the best time for certain types of perspective shots where you want maximum brightness and definition. The trick is to use a polarizing filter to control glare and a reflector to fill in harsh shadows on your subject's face. Those crisp, dark shadows can actually enhance certain perspective illusions, particularly when you're playing with shadow interaction concepts.
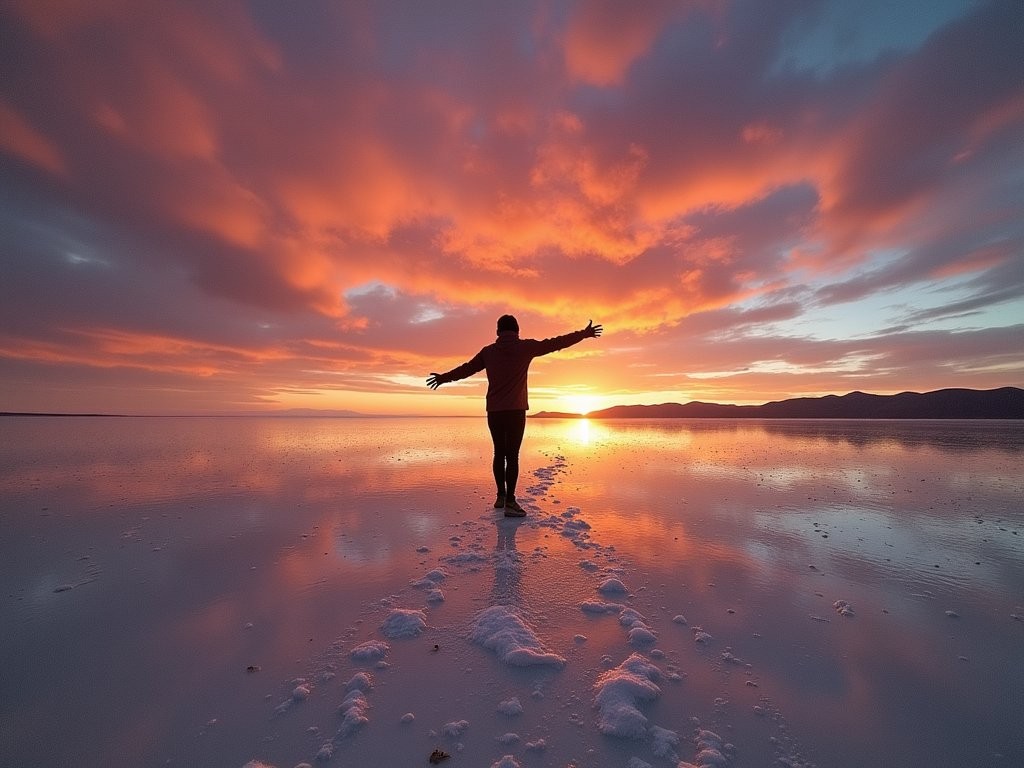
The Evening Show Sunset brings another brief window of magical light, but with a warmer quality than morning. The salt takes on a pinkish-orange hue that creates a dreamlike quality in photos. After the sun dips below the horizon, don't pack up immediately – the blue hour returns with even more saturated colors than morning, and the transition from warm to cool tones happens quickly, giving you a variety of moods within a 30-minute window.
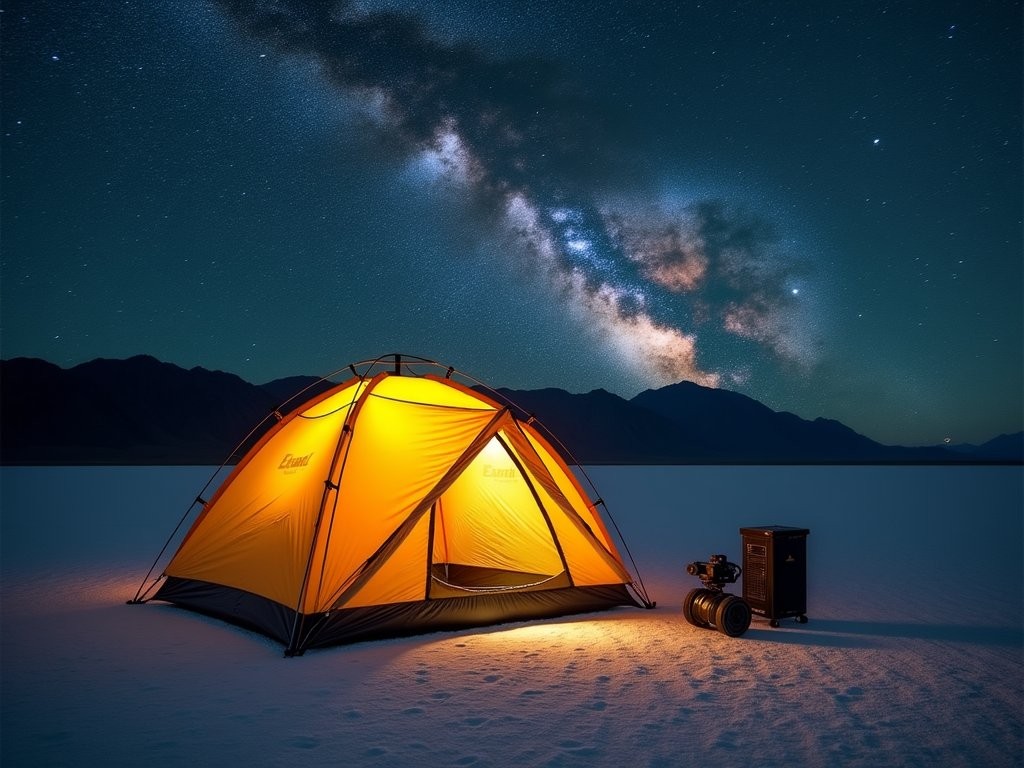
Night Photography Opportunities The salt flats are one of the few places on earth where night photography is relatively accessible to intermediate photographers. The combination of high altitude, minimal light pollution, and reflective white surface creates ideal conditions for astrophotography. On moonless nights, the Milky Way reflects on the salt surface, creating the illusion that your subject is floating in space. During my trip, I spent one entire night shooting star trails and light painting with fellow travelers, creating perspective shots that looked like we were manipulating the cosmos itself.
💡 Pro Tips
- Arrive at your chosen spot at least 30 minutes before sunrise to set up equipment while there's still enough light to see
- Use the PhotoPills app to track exactly where and when the sun will rise/set relative to landscape features
- For night photography, bring a powerful headlamp with a red light mode to preserve your night vision while setting up shots
Post-Processing Tricks for Salt Flat Perspectives
Let me start with a confession: I'm not a Photoshop wizard. My editing philosophy comes from years of appreciating landscapes in their natural state from behind the wheel – enhance what's there, don't fabricate what isn't. That said, salt flat perspective photography benefits enormously from some strategic post-processing to elevate your already mind-bending images.
Cleaning Up the Salt No matter how careful you are, salt flat photos inevitably capture footprints, tire tracks, or disruptions in the pristine surface. Use the healing brush or clone stamp tools in your editing software to clean these up, creating the illusion of an untouched salt canvas. I typically spend 5-10 minutes per image just on this step, focusing on the areas between subjects where distractions break the illusion of scale.
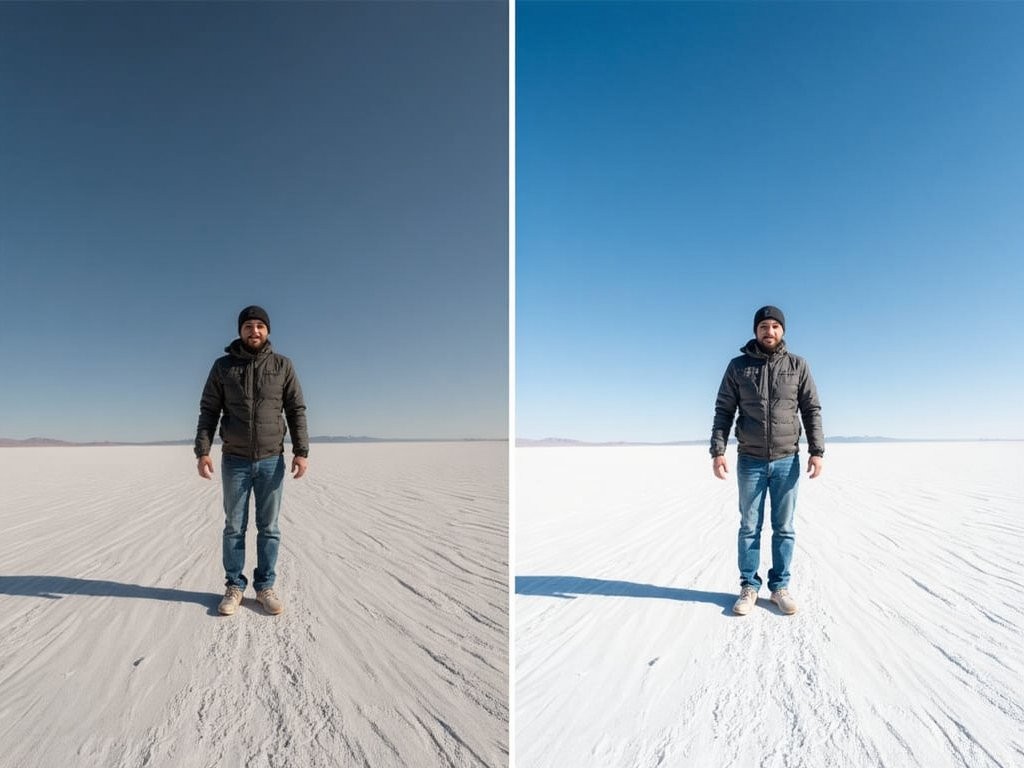
Enhancing the Sky-Ground Separation The visual impact of perspective photos relies heavily on clear definition between the horizon line and sky. I use a graduated filter in editing software to slightly darken the sky while maintaining brightness in the salt flat. This creates greater separation between elements and enhances the surreal quality of your compositions.
Color Temperature Adjustments The blindingly white salt plays tricks on your camera's white balance. Most cameras render the salt with a slightly blue tint, which can look unnatural. I typically warm up my images by 200-300 Kelvin in post-processing to restore the natural warmth, especially for golden hour shots. For blue hour photography, I lean into the coolness but selectively warm up skin tones to maintain natural-looking subjects.
Shadow Recovery The harsh contrast on the salt flats often creates problematic shadows. Rather than eliminating them entirely (which looks fake), I gently lift shadow details by 15-20% to maintain dimensionality while revealing details that might otherwise be lost. This is particularly important for perspective shots where shadows help establish the relationship between subjects.
Composite Techniques (When Necessary) Sometimes, despite your best efforts in the field, certain perspective illusions need help in post. For complex setups involving multiple subjects, I occasionally shoot separate exposures with optimal focus for each subject, then blend them in post-processing. This isn't "cheating" – it's solving a physics problem that even the best aperture settings can't fix when subjects are at dramatically different distances.
The Finishing Touch: Subtle Vignetting A secret weapon in my editing arsenal is extremely subtle vignetting – darkening the corners of the image by just 10-15%. This naturally draws the viewer's eye to your subject and the perspective illusion you've created. The trick is keeping it so subtle that viewers don't consciously notice it.
Remember that the goal of post-processing perspective photos isn't to create something that wasn't there, but to remove distractions that prevent viewers from experiencing the illusion as powerfully as you did in person. When I look at my finished salt flat images, I want them to recreate that same disorienting, magical feeling I had standing there – like I'd somehow driven my truck right off the map into a world where normal rules no longer applied.
💡 Pro Tips
- Create presets for your salt flat photos to maintain consistency across a series of perspective shots
- Use the graduated filter tool to enhance sky-ground separation without making edits look obvious
- When removing footprints, pay special attention to maintaining the natural texture and pattern of the salt polygons
Navigating Tours and Logistics for Photographers
When you've spent as many years navigating North American highways as I have, you develop a healthy skepticism about guided tours. But Salar de Uyuni is different – this isn't a place where you can just rent a car and go exploring independently, unless you have serious off-road driving experience and a death wish for your vehicle.
After researching options extensively, I opted for a private tour rather than the standard shared jeep experience. It cost more (about $150/day versus $30-50/day for shared tours), but the photographic freedom was worth every penny. Standard tours rush through the salt flats in a few hours before moving on to colored lakes and other attractions. As a photographer focused on perspective shots, I needed time – lots of it.
I booked with a local operator in Uyuni who specialized in photography tours, making it clear that I wanted to prioritize extended time on the salt flats during optimal lighting conditions. This meant customizing the itinerary to visit the flats at sunrise and sunset, which standard tours don't offer. My guide, Eduardo, was a former salt worker turned driver who knew hidden access points away from the tourist crowds.
Accommodation Strategy Most multi-day tours include basic accommodation in salt hotels on the edge of the flats. These are novel experiences (walls, beds, tables – all made of salt blocks), but they're not positioned ideally for photographers. I split my accommodation strategy: two nights in a salt hotel in Colchani for comfort and charging batteries, and two nights camping directly on the salt flats for prime positioning at sunrise/sunset.
Camping on the salt requires permits and experienced guides – you can't just pitch a tent anywhere. The night temperatures dropped to 23°F (-5°C), but my expedition-grade sleeping bag kept me comfortable. Waking up surrounded by absolute nothingness as the first light hit the salt crystals was worth every shiver.
Transportation Considerations The standard vehicle for salt flat tours is the Toyota Land Cruiser, which comfortably fits 6 tourists plus driver. As a photographer with equipment, I negotiated for a vehicle with just myself and one friend, giving us space for gear and flexibility for stops. Our driver was also willing to help as a stand-in model for perspective shots when needed – an unexpected bonus.
Practical Challenges The logistics of photography on the salt flats present unique challenges. There's no shade, no bathrooms, and no water sources. I brought a pop-up changing tent that doubled as a private bathroom and equipment changing station to protect gear from salt dust when swapping lenses.
Charging equipment becomes a major concern when camping. I traveled with a portable power station that kept my camera batteries, drone batteries, and phone charged throughout the trip. Solar panels helped top it up during daylight hours.
Insider Tip: The Secret Dry Season Reflection While the rainy season (December-March) is famous for mirror-like reflections, few people know about a phenomenon I discovered through Eduardo. During specific mornings in the dry season, moisture condenses on the salt surface just before sunrise, creating a thin layer of water that offers reflection opportunities for about 30-45 minutes. This happens most reliably in April and October, transitional months when temperature differences between night and day are most extreme.
💡 Pro Tips
- Book private tours directly with local operators in Uyuni rather than through international booking sites to negotiate custom photography itineraries
- Request a guide who speaks your language AND has experience with photographers – they'll understand your need to wait for the right light
- Bring twice as many camera batteries as you think you'll need – cold temperatures drain them quickly
Final Thoughts
As I packed up my gear on the final morning, watching the sun transform the salt crystals into millions of glittering diamonds, I couldn't help but reflect on how this landscape had changed my perspective – both photographically and personally. The endless white canvas of Salar de Uyuni strips away distractions and forces you to see differently, to play with reality in ways that remind you how subjective our perception truly is.
Whether you're a seasoned photographer or someone who just wants to capture memorable images, these salt flats offer something magical that exists nowhere else on Earth. The techniques you'll learn here – about light, perspective, patience, and creative problem-solving – will transform how you approach photography long after you've washed the last grains of salt from your boots.
I've driven across North America countless times, camera always within reach, but Bolivia's salt flats taught me to see beyond the frame, to question scale and perspective in ways I never considered before. So pack your gear, bring your imagination, and prepare to create images that bend reality. Just remember to occasionally put the camera down and let your eyes capture memories no sensor can fully reproduce – the feeling of standing in a place where earth and sky seem to merge into infinity.
✨ Key Takeaways
- The best perspective photos come from careful planning, precise positioning, and shooting during optimal light conditions
- Protect your gear from salt damage with proper precautions and cleaning routines
- Creative perspective shots require thinking beyond standard poses – experiment with shadow play, reflections, and optical illusions
- Private or photography-focused tours offer the flexibility needed to capture unique images away from crowds
📋 Practical Information
Best Time to Visit
April-November (dry season), with April and October offering occasional morning reflections
Budget Estimate
$800-1200 for a week including private tours, accommodation, and meals
Recommended Duration
3-5 days minimum for photographers
Difficulty Level
Moderate (High Altitude, Extreme Temperatures, Remote Location)


Comments
backpackpro
Really cool photos! Adding this to my South America itinerary.
Claire Hawkins
Love this guide, Nova! We took our two kids (5 and 8) to Salar de Uyuni last year and it was one of those trips that reminded me why we travel as a family. The perspective photos were hilarious - my daughter insisted on being 'eaten' by a toy dinosaur and my son wanted to be a giant stomping on us. Your section on timing is spot-on. We did sunrise one morning and the kids were cranky, but the photos made it worth it. One practical tip for families: bring snacks and water because there's literally nothing out there. The salt hotels are a fun experience too if you're staying overnight!
springbackpacker
Going there in August! Any recommendations for tours or is it easy to do on your own? I've heard mixed things about needing a guide vs renting a car.
Claire Hawkins
We did a tour with our kids and it was definitely the right call for us. The drivers know exactly where to go for the best shots and you don't have to worry about getting stuck. If you're solo and experienced with 4x4s though, renting could be fun!
Lillian Diaz
Nova, this brings back so many memories! I visited Salar de Uyuni three years ago during the wet season and it was absolutely magical. Your tip about the light factor is SO important - I learned the hard way that midday shots just don't work there. The reflection during sunrise though? Chef's kiss. One thing I'd add is to bring extra batteries because the cold absolutely drains them. I went through three times as many as I expected. Also totally agree about going beyond the typical perspective shots - the hexagonal salt patterns at golden hour are criminally underrated!
springbackpacker
Good call on the batteries! Didn't even think about that.
traveladventurer
How long did you spend there? Trying to figure out if 2 days is enough or if I should do 3?
Nova Harper
I did 3 days and honestly glad I did. Day 1 was getting used to the light, Day 2 was my best shots, and Day 3 I explored different areas. 2 days works if you're pressed for time though!
traveladventurer
Perfect, thanks! Will do 3 then.
dreamguide
Those perspective shots are insane! Definitely on my list now.
Taylor Moreau
Excellent guide, Nova. I visited Salar de Uyuni during a business trip to Bolivia last year and your section on the light factor is particularly valuable. I'd emphasize booking accommodation in Uyuni town at least a week in advance during peak season - I made the mistake of arriving without reservations and options were quite limited. The perspective photography techniques you've outlined are spot-on. For those serious about photography, I found my wide angle lens essential for capturing the scale of the flats. The lack of reference points makes composition challenging but rewarding.
winternomad
Great post Nova! I did this last year and your tip about getting low to the ground is spot on. One thing I'd add - bring WAY more water than you think you need. The altitude and sun are brutal. Also those little toy props everyone uses? Don't buy them from tour operators, get them in Uyuni town for like 1/3 the price. The dinosaur and boot props are classic but I brought my own action figures and they worked great. My biggest regret was not bringing sunscreen for my EARS - got so burned lol.
redfan
lol the ears! good tip
smartexplorer
Going in May! Can't wait to try these shots
adventureclimber
This looks incredible! I'm planning my first trip to South America and this is definitely on my list. Quick question - you mentioned timing for the light, but what time of year is best? I've heard the rainy season creates mirror effects but not sure if that makes the perspective shots harder or easier? Also is it easy to get there from La Paz or do you need to book a tour?
winternomad
Not Nova but I went in February (rainy season) and the mirror effect is UNREAL. Perspective shots work differently but they're still amazing. You definitely want a tour from Uyuni town, not La Paz.
adventureclimber
Thanks! That's super helpful
Venture X
Premium card with 2X miles, $300 travel credit, Priority Pass