


Disclosure: This article contains affiliate links. We may earn a commission from purchases at no extra cost to you, which helps our travel content.
There's a financial principle I've always lived by: diversification reduces risk while maximizing potential returns. The same applies to photography destinations in Japan. While Tokyo commands the spotlight in most itineraries, savvy photographers know that Yokohama – just 30 minutes south – offers an exceptional ROI on your creative investment. After three visits spanning a decade, I've mapped out this port city's visual assets with the same precision I apply to a well-balanced portfolio. This spring, I spent a week methodically exploring Yokohama's photographic opportunities, from its futuristic skyline to traditional gardens, testing various lenses and drone flight paths to optimize results. What follows is my analytical breakdown of how to capture this underrated Japanese gem – a city that delivers consistent visual dividends without the overcrowded conditions of its famous neighbor.

Planning Your Photographic Investment: When and Where to Go
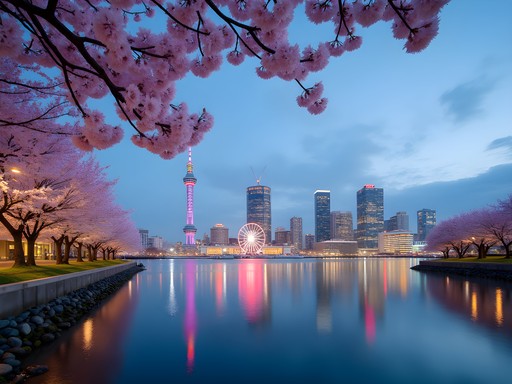
As any financial advisor will tell you, timing is everything – whether in markets or photography. Spring in Yokohama offers an optimal balance of photographic variables: comfortable temperatures (averaging 15-20°C/59-68°F), extended golden hours, and the bonus dividend of cherry blossoms typically blooming from late March to early April.
I structured my photographic portfolio around three prime shooting windows daily:
-
Dawn patrol (5:00-7:30 AM): The harbor area and Osanbashi Pier offer exceptional blue hour and sunrise compositions with minimal human interference. The risk of early rising pays off with unobstructed views of the Yokohama Bay Bridge catching first light.
-
Mid-morning to afternoon (10:00 AM-3:00 PM): Allocate these hours to Sankeien Garden or the Cup Noodles Museum where controlled indoor lighting or dappled garden shade mitigates harsh overhead sun.
-
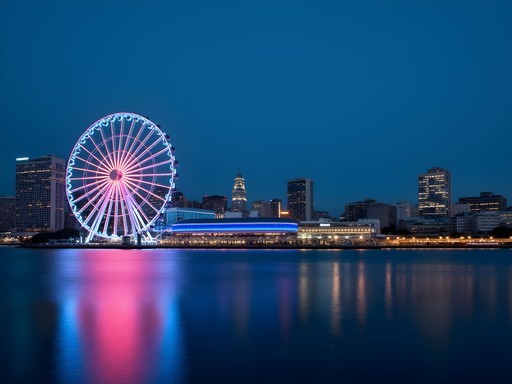
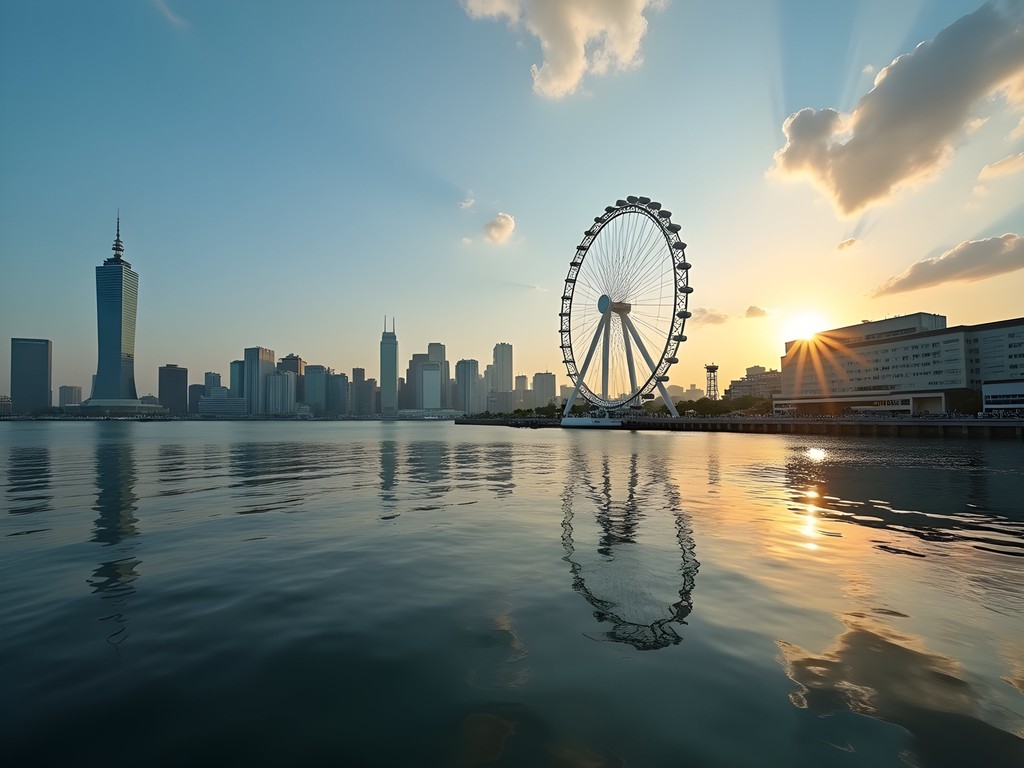
Golden hour to blue hour (4:30-7:30 PM): Position yourself at Minato Mirai for the optimal risk-adjusted return on sunset conditions. The Cosmo Clock 21 Ferris wheel and the distinctive Landmark Tower create compelling silhouettes against the setting sun.
For equipment, I traveled with my trusty Sony Alpha a7 IV as my primary body, paired with three lenses: a 16-35mm f/2.8 for architecture and landscapes, a 24-70mm f/2.8 for street photography, and a 70-200mm f/4 for compressed cityscapes. My drone of choice remains the DJI Air 2S for its exceptional image quality-to-weight ratio – a critical consideration when traveling with carry-on only.
A word of caution on drone operations: Japan has strict regulations. Register your drone in advance through the DIPS system if it weighs over 100g, and thoroughly research no-fly zones, which include most of central Yokohama. I found legal flight opportunities in less restricted areas like the outskirts of Kanazawa district, always maintaining line of sight and flying below 150 meters as required by law.
💡 Pro Tips
- Register your drone through Japan's DIPS system at least 2 weeks before arrival
- Download the Yokohama Official Visitors' Guide app for updated cherry blossom forecasts
- Book accommodations in Minato Mirai area for easy access to dawn/dusk shooting locations
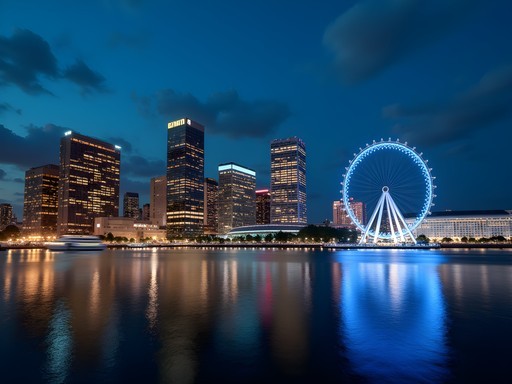
Minato Mirai: High-Yield Urban Landscapes
If Yokohama were a financial portfolio, Minato Mirai would be its blue-chip stock – reliable, impressive, and consistently delivering visual returns regardless of market conditions. This futuristic waterfront district presents a carefully planned composition of architectural elements that practically arrange themselves into compelling frames.
The district's photographic centerpiece is undoubtedly the Landmark Tower observation deck on the 69th floor. At ¥1,000 ($7 USD) for entry, it offers an exceptional value proposition compared to Tokyo's crowded viewpoints. I calculated optimal timing and arrived 30 minutes before sunset, securing a prime position by the northwest-facing windows. This strategic positioning allowed me to document the transition from golden hour through blue hour to night illumination – essentially capturing three distinct portfolios from a single investment of time.
At street level, the Cosmo World amusement park provides foreground interest against the urban backdrop. The 112.5-meter Cosmo Clock 21 Ferris wheel transforms from daytime architectural element to illuminated timepiece after dark, with its reflection in surrounding water features doubling your compositional opportunities. My technical approach here involved bracketing exposures (three shots at -2/0/+2 EV) to later blend in post-processing, preserving both shadow detail in buildings and highlight information in bright illuminations.
For gear stability in these low-light conditions, I relied on my Peak Design Travel Tripod. Its carbon fiber construction offers an optimal balance sheet of weight savings versus stability – a critical consideration when you're carrying equipment all day. The rapid deployment mechanism proved particularly valuable when racing between composition points as lighting conditions evolved.
One undervalued asset in this district is the Kishamichi Promenade – a converted railway line offering unique perspectives of both the skyline and intimate architectural details. I found this location particularly productive during blue hour, when the warm building lights create maximum contrast against the deepening blue sky – a 15-20 minute window that delivers exceptional risk-adjusted returns.

💡 Pro Tips
- Visit Landmark Tower observation deck 30 minutes before sunset and stay through blue hour for three distinct lighting scenarios
- Use the Kishamichi Promenade for unique skyline angles without tourist crowds
- Bring a variable ND filter for long exposures of the harbor water during daylight hours
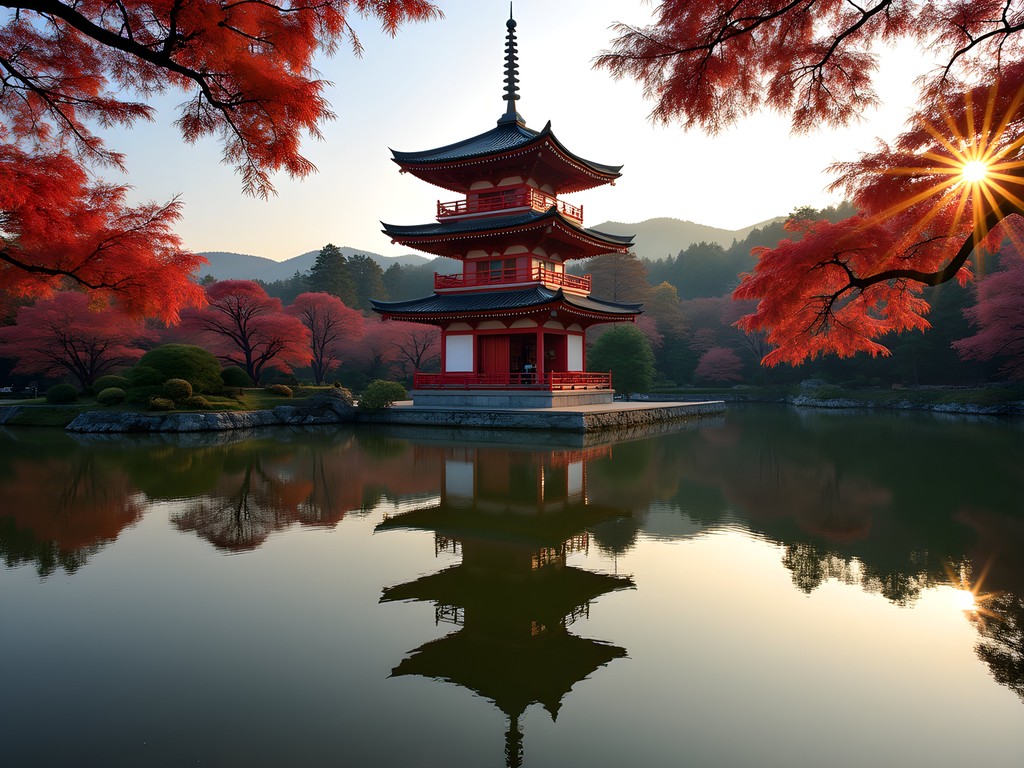
Sankeien Garden: Diversifying with Traditional Compositions
Any balanced portfolio requires diversification, and Sankeien Garden provides the perfect traditional counterweight to Yokohama's modern architecture. Located about 30 minutes by taxi from the city center (approximately ¥3,000 or $20 USD), this historic garden represents an excellent allocation of your photographic resources.
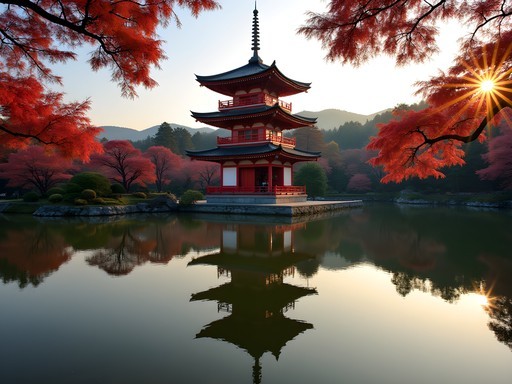
Created by silk merchant Sankei Hara in 1906, this 175,000 square meter garden combines natural landscapes with historic buildings relocated from Kyoto and Kamakura. From a photographer's perspective, it's essentially a concentrated portfolio of traditional Japanese aesthetics without the overwhelming crowds of more famous gardens.
I approached Sankeien methodically, arriving at opening time (9:00 AM) to maximize shooting time before tour groups arrived. My strategy involved working from outer garden to inner garden, focusing on three key compositional themes:
-
Architectural framing: Using the historic structures to frame natural elements, particularly the three-story pagoda overlooking the pond
-
Reflection compositions: Capturing the interplay between buildings and their mirror images in the carefully positioned water features
-
Intimate botanical studies: Documenting seasonal elements like cherry blossoms, irises, or autumn foliage depending on your timing
For this environment, I primarily relied on my 24-70mm lens, occasionally switching to a wider 16-35mm for architectural contexts. A circular polarizing filter proved invaluable for managing reflections – sometimes enhancing them, other times minimizing them depending on the composition.
Lighting conditions here follow predictable patterns, with dappled morning light creating high contrast situations. I found myself frequently using my 5-in-1 Reflector to fill shadows when photographing detailed elements like stone lanterns or moss gardens. This simple tool delivers exceptional ROI in terms of image quality improvement versus cost and carrying weight.
The garden charges a modest ¥700 ($5 USD) entry fee, making it one of the best value propositions in the region. Plan for 2-3 hours minimum to properly document the changing light as it moves through the garden's various sections.
💡 Pro Tips
- Arrive at opening time (9:00 AM) to avoid tour groups and capture morning light
- Focus on the inner garden area for the most photogenic traditional buildings
- Bring a polarizing filter to manage reflections in water features

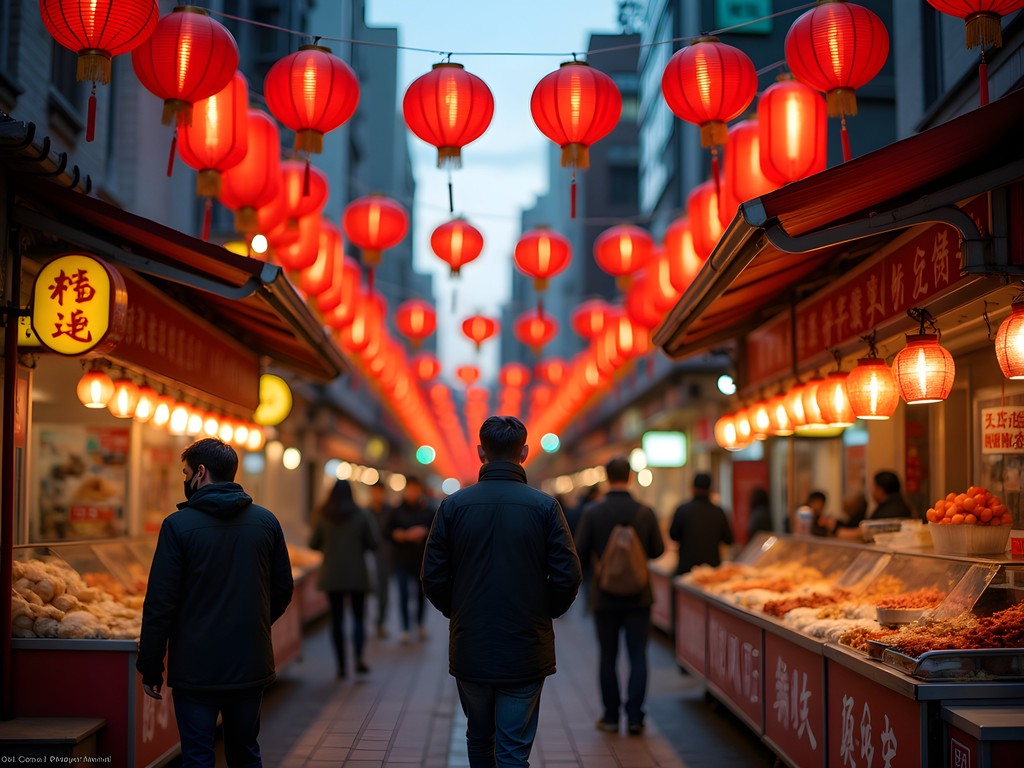
Yokohama Chinatown: High-Contrast Street Photography
Yokohama Chinatown represents a high-volatility but potentially high-return environment for street photography. As Japan's largest Chinatown, this densely packed neighborhood offers visual stimulation that borders on sensory overload – a challenging but rewarding photographic market to navigate.
My approach to this visually complex environment was systematic: I allocated two separate shooting sessions to maximize varied lighting conditions and crowd dynamics:
-
Morning session (7:30-9:30 AM): Focusing on food preparation, opening rituals, and architectural details without crowds
-
Evening session (6:00-8:00 PM): Capturing illuminated lanterns, street food vendors, and the energy of dinner crowds
From a technical standpoint, Chinatown demands flexible equipment choices. I primarily shot with my 35mm f/1.8 prime lens, which offered the ideal balance of contextual framing and low-light performance. The fast aperture proved particularly valuable for isolating subjects against the visually busy backgrounds.
Color is the primary visual currency here. The neighborhood's red lanterns, ornate gates, and vibrant signage create a rich palette that I enhanced by setting my camera's color profile to boost saturation slightly in-camera. While I typically prefer a more neutral approach, this environment benefits from a controlled increase in color intensity.
For street photography in crowded conditions, I've found the BlackRapid Breathe Curve Camera Strap to be an excellent investment. The cross-body design distributes weight effectively during long shooting sessions, while the quick-adjust mechanism allows for rapid deployment when photographic opportunities emerge suddenly – essentially reducing your reaction time to market changes.
One undervalued location within Chinatown is Kanteibyo (Guan Di Miao), a Chinese temple tucked away from the main thoroughfare. The temple offers a visual respite from the commercial areas, with incense smoke creating atmospheric lighting conditions when it catches the sunlight. Time your visit around 4:00 PM when afternoon light streams through the entrance at an optimal angle.
Food photography opportunities abound, but require careful composition to stand out from typical tourist snapshots. I approached food stalls methodically, first capturing wider contextual shots of the preparation, then moving to medium compositions showing vendor-customer interactions, and finally to close-up details of the food itself – essentially creating a visual story with decreasing focal lengths.
💡 Pro Tips
- Visit during both morning and evening for completely different lighting and atmosphere
- Focus on interaction between vendors and customers rather than just food close-ups
- Use wide apertures (f/1.8-f/2.8) to isolate subjects against busy backgrounds
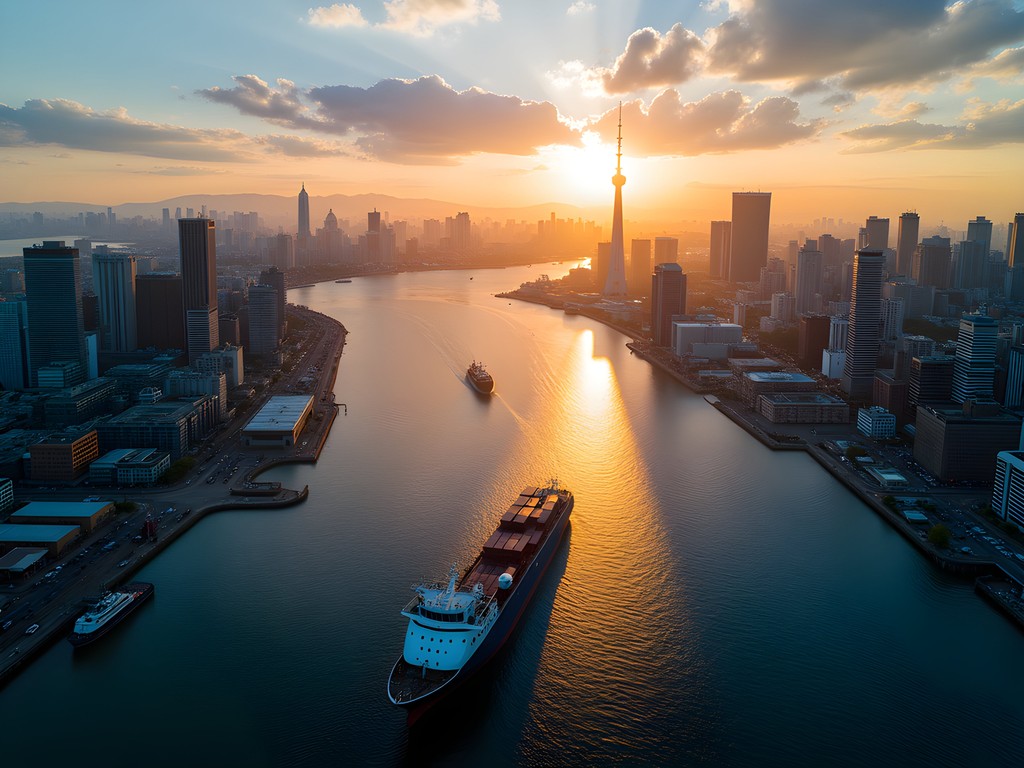
Aerial Portfolio: Drone Photography Opportunities
Incorporating aerial perspectives into your Yokohama portfolio requires careful planning and strict adherence to local regulations. Japan's drone laws underwent significant changes in 2022, making compliance more complex but still manageable for the prepared photographer.
After thorough research and proper registration through the DIPS system, I identified several legally accessible locations that offer compelling aerial compositions while remaining outside restricted airspace:
-
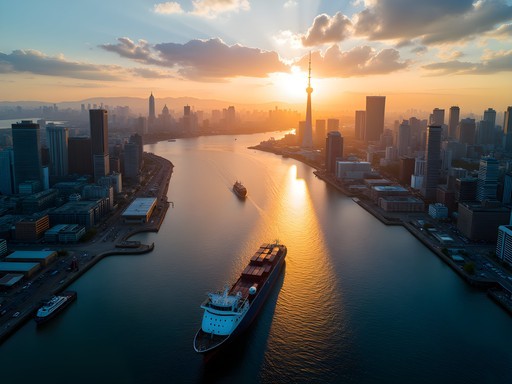
Negishi Bay Area: Located southwest of central Yokohama, this coastline offers unobstructed views toward the city skyline without the flight restrictions that apply to the central harbor. Morning flights (6:00-7:30 AM) provide optimal lighting conditions with the sun illuminating the city front.
-
Kanazawa Seaside Park: This outlying area permits drone operations with appropriate permissions, offering unique perspectives of where Yokohama's urban environment meets Tokyo Bay. The geometric patterns of the park's design create compelling abstract compositions from above.
-
Tsurumi River Estuary: This northern area allows for interesting industrial landscape documentation where shipping channels and port infrastructure create leading lines toward the city center.
For aerial work, my DJI Air 2S continues to deliver exceptional value with its 1-inch sensor and 5.4K video capabilities. The 20MP still images retain enough resolution for significant cropping in post-production – essentially allowing you to rebalance your compositional portfolio after the fact.
My technical approach to drone photography in Yokohama follows the same principles I apply to traditional photography: I bracket exposures (typically three shots at different exposure values) to maximize dynamic range in challenging lighting conditions. This is particularly important when capturing the transition between water and urban environments, where exposure values can vary dramatically.
For drone operations, I maintain a disciplined pre-flight checklist that includes:
- Verifying airspace restrictions using both DJI Fly app and third-party sources
- Setting appropriate return-to-home altitude based on surrounding structures
- Calibrating compass away from electromagnetic interference
- Establishing visual observers when operating in complex environments
This methodical approach to aerial photography minimizes operational risks while maximizing creative opportunities. Remember that regulations can change, so always perform due diligence before each flight session.
💡 Pro Tips
- Always check both DJI Fly app AND official Japanese airspace maps as they sometimes differ
- Fly during early morning to minimize wind interference and maximize battery performance
- Create a shot list before takeoff to maximize efficiency during limited flight time
Post-Processing: Maximizing Your Visual Returns
The final crucial step in optimizing your Yokohama photography portfolio is post-processing – essentially the value-added refinement that transforms raw assets into polished final products. My approach to editing Yokohama images follows a disciplined methodology focused on maintaining authenticity while enhancing visual impact.
I structure my workflow into three distinct phases:
-
Initial assessment and selection: Using Adobe Lightroom to cull and rate images based on technical execution and compositional strength – essentially performing fundamental analysis on my visual assets
-
Global adjustments: Applying calibrated color profiles specific to different Yokohama environments (I've developed custom profiles for Minato Mirai architecture, traditional gardens, and nighttime street scenes)
-
Targeted local adjustments: Using luminosity masks and graduated filters to balance exposure challenges common in Yokohama's high-contrast urban environments
For Yokohama specifically, I've found several consistent post-processing patterns that enhance the city's unique visual characteristics:
-
Minato Mirai architecture: Slight increase in clarity (+15-20) and texture (+10) to enhance structural details, with careful attention to maintaining natural color in the distinctive Landmark Tower facade
-
Harbor reflections: Selective dodging of reflection highlights to enhance water detail without creating unnatural brightness
-
Traditional gardens: Restrained vibrance increase (+10-15) rather than saturation to maintain authentic foliage color while enhancing visual impact
-
Chinatown night scenes: Careful noise reduction balanced against detail preservation, with selective color adjustments to maintain the authentic red lantern color that often shifts under artificial lighting
My post-processing tools include Adobe Lightroom for 80% of adjustments, with selective use of Photoshop for complex compositing or advanced retouching. For efficiency in managing large image catalogs from travel shoots, I rely on the Samsung T7 Portable SSD. This compact storage solution offers exceptional data transfer speeds that significantly reduce backup time in the field – essentially improving workflow efficiency and reducing downtime between shooting sessions.
Remember that post-processing should enhance rather than fundamentally alter the authentic character of Yokohama. My philosophy remains consistent with my financial advisory approach: seek sustainable growth rather than unsustainable manipulation. The goal is to present Yokohama as it truly appears when seen under optimal conditions – maintaining documentary integrity while maximizing visual impact.
💡 Pro Tips
- Create location-specific presets for different Yokohama environments to maintain consistent processing
- Use luminosity masks to selectively enhance architectural details without affecting sky exposure
- Back up images daily to multiple storage devices – hotel safes aren't always reliable for electronics
Final Thoughts
After a week of methodically documenting Yokohama, I've found it to be one of Japan's most undervalued photographic assets – offering exceptional visual returns without the overcrowded conditions that often compromise Tokyo shoots. The city presents a perfectly balanced portfolio of ultramodern architecture, traditional Japanese aesthetics, and vibrant street life that can be captured efficiently with proper planning.
As with any investment strategy, diversification is key. Allocate your photographic time across different districts, lighting conditions, and perspectives to maximize your creative returns. The methodical approach I've outlined should serve as a framework rather than a rigid itinerary – remain flexible enough to capitalize on unexpected opportunities while maintaining overall discipline in your approach.
Yokohama rewards the patient and prepared photographer. By applying the same analytical mindset that serves me well in financial planning, I've consistently extracted maximum value from this remarkable city. I encourage you to approach it with both technical precision and creative openness – the photographic equivalent of a balanced growth strategy.
✨ Key Takeaways
- Yokohama offers exceptional photographic value with significantly fewer crowds than Tokyo
- Allocate shooting time strategically across early morning, midday, and evening sessions to maximize different lighting conditions
- Diversify your portfolio across modern architecture, traditional gardens, and street photography for a comprehensive visual story
- Research drone regulations thoroughly before travel and focus on legally accessible areas outside restricted zones
📋 Practical Information
Best Time to Visit
Late March to early May (spring) for cherry blossoms and comfortable temperatures
Budget Estimate
$120-180 per day excluding accommodation (mid-range)
Recommended Duration
5-7 days
Difficulty Level
Intermediate
Comments
mountainpro
Been to Yokohama 4 times. Your financial metaphors are funny but accurate lol. One thing - get the Minatomirai ticket for unlimited rides on the loop line. Saves time hopping between photo spots. Also Red Brick Warehouse at blue hour is chef's kiss.
skychamp1776
Really cool! Thanks for sharing this.
Hunter Thompson
Brilliant guide mate! I was in Yokohama last year and completely missed Sankeien Garden - gutted about that now after seeing your shots. The Chinatown section is spot on though. I spent an entire afternoon there and the light through those lanterns around 4pm is absolutely mental. One tip I'd add: the Cup Noodles Museum area has some quirky architectural shots if you're into that sort of thing. Not traditional Japanese but the colors and lines are fantastic. Definitely heading back to hit up that garden!
skychamp1776
Cup Noodles Museum is on my list! Looks so fun.
happyrider
Great post! Quick tip - if you're shooting Minato Mirai at night, the Landmark Tower observation deck stays open til 10pm and gives you weather protection if it rains. Worth the admission if you want guaranteed shots.
smartlife
Quick question - did you shoot most of these at sunrise or sunset? Trying to plan my schedule and not sure which is better for Minato Mirai. Also is the observation deck worth it for photos or better from ground level?
Nicholas Roberts
Great question! I actually preferred sunrise for Minato Mirai - fewer crowds and softer light on the bay. The observation deck gives you incredible wide shots, but I got my favorite compositions from the waterfront promenade at ground level. Both are worth it if you have time!
smartlife
Perfect, thanks! Sunrise it is then.
winterrider
Those Minato Mirai shots are incredible! Going in March, fingers crossed for good weather!
mountainpro
March is solid. Less humid than summer for sure.
Sophia Gomez
I spent three days in Yokohama last spring and your 'diversification' analogy really resonates! I found myself shooting everything from neon-lit ramen shops in Chinatown to serene temple gardens, all within a 20-minute train ride. One tip for street photographers: the narrow alleys behind Yokohama Stadium have incredible izakaya scenes in the evening—locals gathering, red lanterns, that authentic atmosphere. Just be respectful and ask before photographing people. The camera strap I brought was perfect for walking around all day without shoulder fatigue.
coolphotographer
ooh adding the stadium area to my list! thanks for the tip
nomadwalker8875
Love your photos! The one with the ferris wheel reflection is amazing
Taylor Moreau
Excellent guide, Nicholas. I photographed Yokohama last autumn and completely agree about it being undervalued compared to Tokyo. One addition: the Red Brick Warehouse district at blue hour offers superb architectural photography opportunities, particularly with the harbour reflections. The contrast between the historic warehouses and modern Minato Mirai skyline in the background creates compelling compositions. I'd also recommend the Osanbashi Pier for elevated cityscape perspectives—it's free and open 24 hours.
happyrider
Second the Osanbashi Pier recommendation! Was there last year and the views are nuts
luckyqueen
do you need special permits to shoot in sankeien garden? looks beautiful but dont want to get in trouble lol
Sophia Gomez
No permits needed for handheld photography! Just no tripods without permission and be respectful during tea ceremonies.
luckyqueen
perfect thank you!!
Venture X
Premium card with 2X miles, $300 travel credit, Priority Pass