

Disclosure: This article contains affiliate links. We may earn a commission from purchases at no extra cost to you, which helps our travel content.
There's something profoundly humbling about standing before a centuries-old totem pole, camera in hand, whilst the mist rolls in from the Inside Passage. Ketchikan surprised me—I'd come expecting dramatic landscapes, but what I found was a masterclass in cultural storytelling through both indigenous art and the raw, moody beauty of Southeast Alaska. This isn't your typical cruise port stop; spend a proper week here, and you'll discover why photographers and cultural enthusiasts alike consider it sacred ground.

Understanding the Light: Ketchikan's Unique Photography Conditions
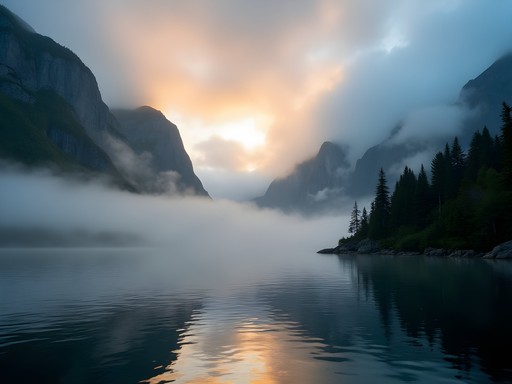
Ketchikan receives over 150 inches of rain annually, earning its reputation as one of Alaska's wettest towns. But here's what the guidebooks won't tell you: that moisture creates the most extraordinary diffused light I've encountered outside of Copenhagen's winter months. The mist acts as nature's softbox, eliminating harsh shadows and creating an ethereal quality that's particularly stunning for landscape and cultural photography.
Your gear needs protection, though. I learned this the hard way on day two when a sudden downpour caught me photographing Creek Street. Invest in a proper rain cover that allows you to keep shooting without constantly wiping your lens. The weather changes every fifteen minutes here—embrace it rather than fight it. Some of my most compelling shots came during those transitional moments when sunlight breaks through the clouds, illuminating totems against dark, brooding skies.

💡 Pro Tips
- Shoot in RAW format to maximize your ability to recover details in both highlights and shadows—the dynamic range here is extreme
- Keep lens cloths in multiple pockets; you'll go through several per day in the mist
- Plan your most important shots for the golden hours between 5-7am and 8-10pm in summer—the light is genuinely magical
- Embrace slower shutter speeds to capture the movement of mist through the fjords
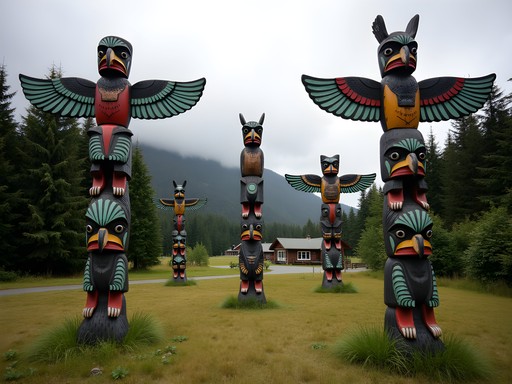
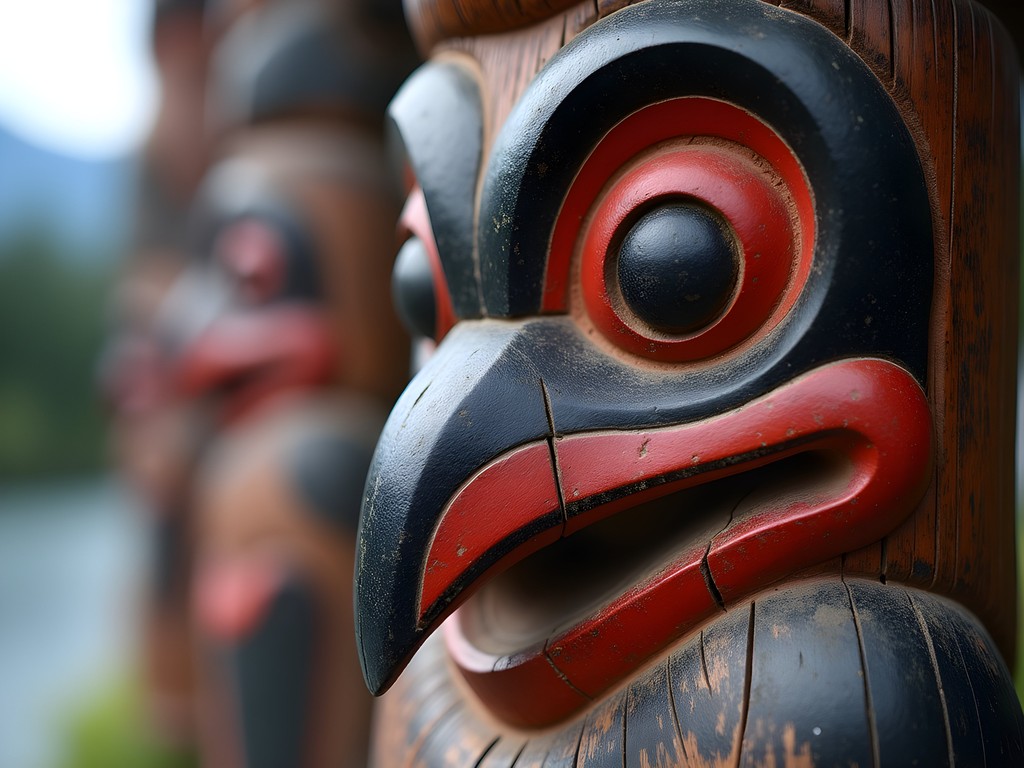
Totem Bight State Historical Park: Photographing Living Culture
Ten miles north of downtown, Totem Bight represents something far more significant than a photo opportunity—it's a preservation site where Tlingit and Haida master carvers restored totems that were deteriorating in abandoned villages. As someone who's spent years advocating for inclusive education, I found the interpretive signage here exemplary in its cultural sensitivity and depth.
Photographically, the park presents fascinating challenges. The totems stand within a temperate rainforest setting, creating dappled light conditions that shift constantly. I spent three separate mornings here, each visit revealing different possibilities. The key is patience and respect—these aren't mere sculptures but cultural narratives carved in cedar. Take time to understand the stories before you compose your shots. The clan house at the end of the trail offers particularly striking compositions, especially when photographed from the beach looking back toward the forest.
For those serious about capturing fine detail in the carvings, bring a circular polarizer to cut through the glare on wet wood surfaces and enhance the natural colors of the weathered cedar. The difference in your images will be substantial.
💡 Pro Tips
- Visit early morning before tour groups arrive—you'll have the totems essentially to yourself before 9am
- Bring a longer lens (70-200mm) to capture intricate carving details without getting uncomfortably close
- Study the cultural significance of each totem before photographing; your images will have more intentionality
- The forest trail itself offers gorgeous environmental portraits of totems in their natural setting
Saxman Native Village: Where Photography Meets Cultural Exchange
Located just south of Ketchikan, Saxman Village hosts the world's largest collection of standing totem poles. But what distinguishes this location is the opportunity to witness contemporary carvers at work in the Carving Center. I spent an afternoon photographing master carver David Boxley as he worked on a commission, and the resulting portraits rank among my favorite cultural documentation work.
The village requires a different photographic approach than Totem Bight. Here, the totems stand in an open area with more direct light, creating higher contrast situations. I found myself shooting primarily in the softer light of overcast days or during the extended twilight hours of Alaskan summer evenings. The Beaver Clan House provides excellent architectural photography opportunities, particularly the interior house posts illuminated by natural light from the doorway.
A word about cultural protocol: always ask permission before photographing people, and be prepared to put your camera down if requested. I've found that showing genuine interest in the stories behind the art opens doors that aggressive photography never will. Several elders shared family histories with me only after I'd spent time simply listening, camera packed away.

💡 Pro Tips
- Book the cultural tour to gain context that will inform your photographic choices—it's worth every penny
- Respect photography restrictions during dance performances; some ceremonies are not meant to be photographed
- The gift shop sells locally-made items by indigenous artists—supporting the community directly
- Golden hour here is spectacular for capturing the totems against the backdrop of Tongass National Forest

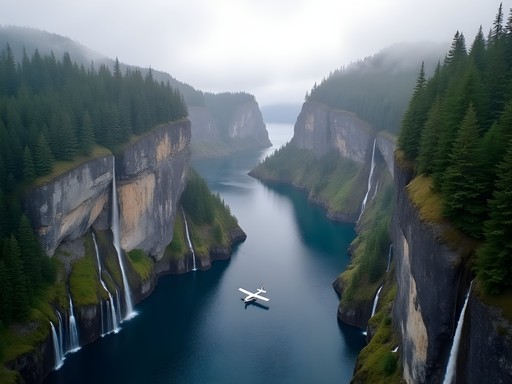
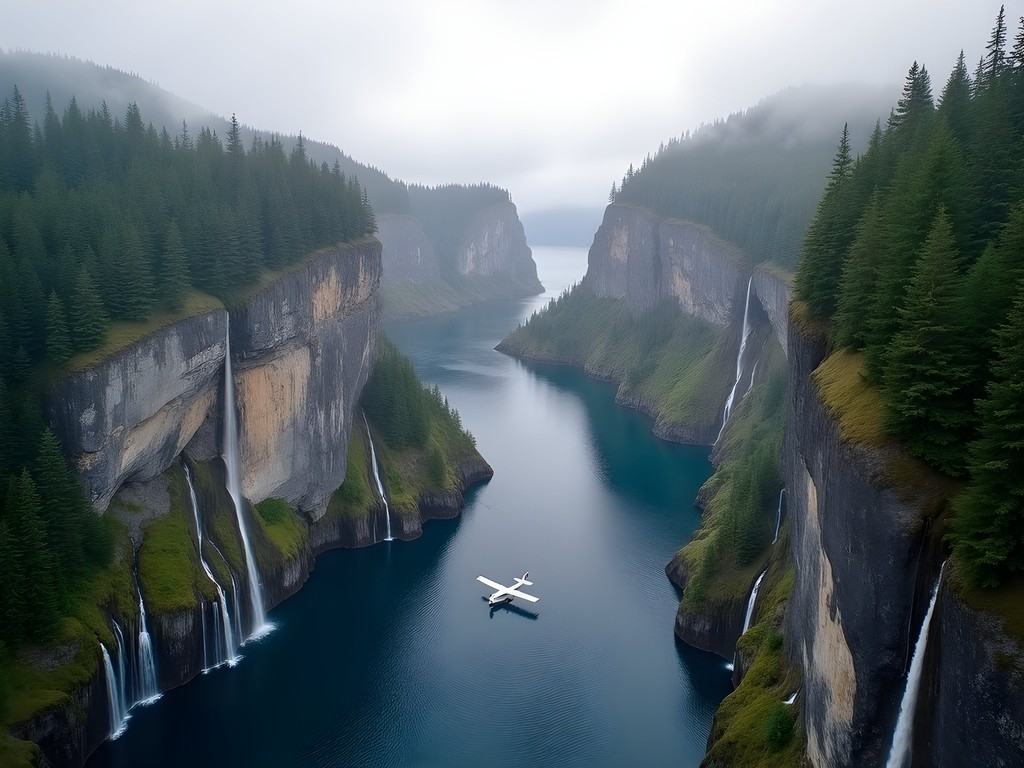
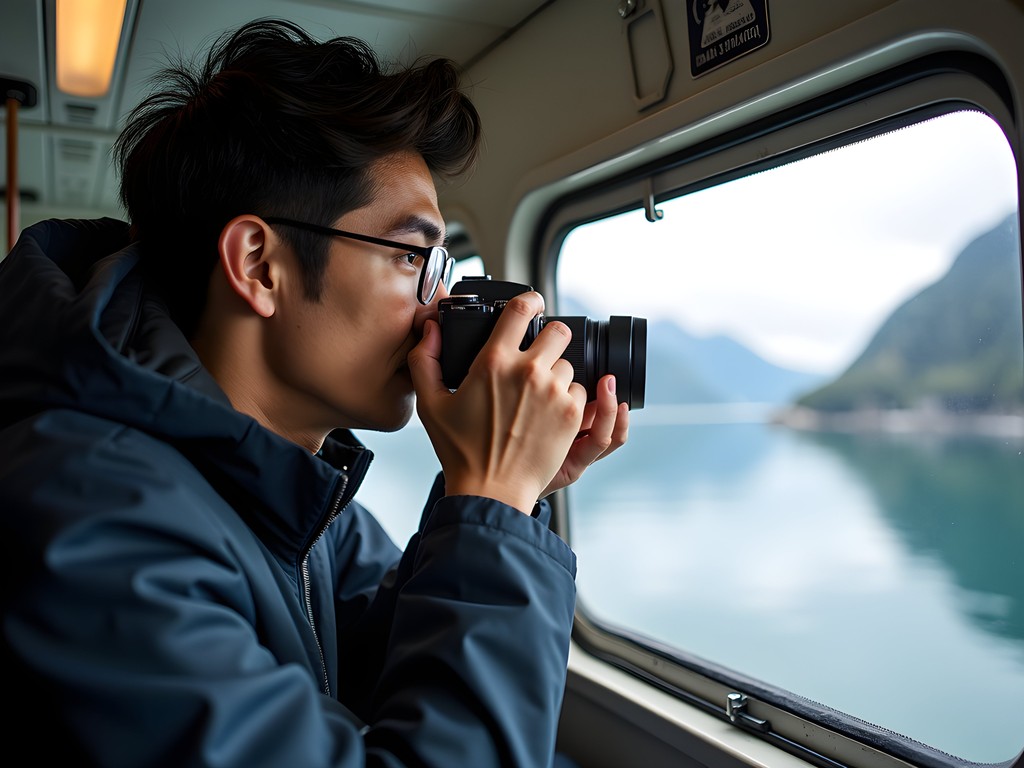
Misty Fjords by Floatplane: Aerial Photography Considerations
The floatplane journey to Misty Fjords National Monument ranks among the most photographically rewarding experiences of my career. The 40-minute flight passes over dozens of islands, glacial valleys, and pristine wilderness before landing on a remote mountain lake surrounded by 3,000-foot granite cliffs.
Aerial photography from a small aircraft presents unique challenges. Window reflections, vibration, and constantly changing angles require both technical preparation and adaptability. I booked a morning flight with Island Wings Air Service, specifically requesting a window seat on the right side for optimal light. The pilot, a third-generation Ketchikan resident, proved invaluable in timing our passes over particularly photographic features.
The landing on the lake itself is surreal—suddenly you're floating in absolute silence, surrounded by waterfalls cascading down moss-covered cliffs. We had 45 minutes on the water, enough time to capture the reflections and scale of this extraordinary landscape. Pack a waterproof dry bag for your gear during the water landing; even though the planes are stable, spray is inevitable. I also brought a lens cleaning kit which proved essential for dealing with water spots between shots.
💡 Pro Tips
- Book the earliest flight possible—morning light is superior and weather tends to deteriorate as the day progresses
- Use a fast shutter speed (minimum 1/500s) to counter aircraft vibration and movement
- Shoot through the window at an angle to minimize reflections; never press your lens directly against the glass
- A polarizing filter is counterproductive through aircraft windows—it will create strange color banding
- Bring a wide-angle lens for the lake landing shots and a telephoto for aerial details
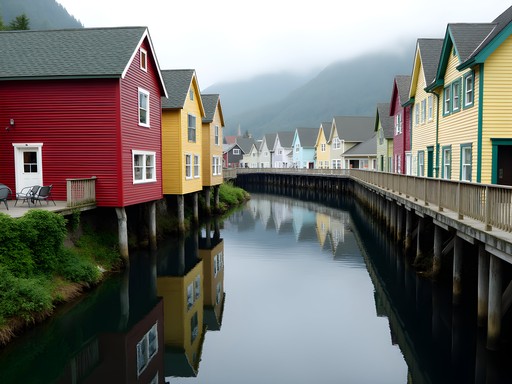
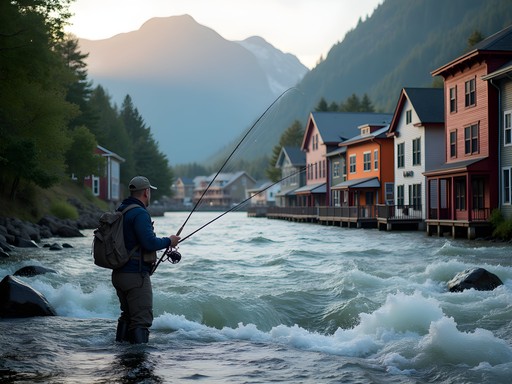
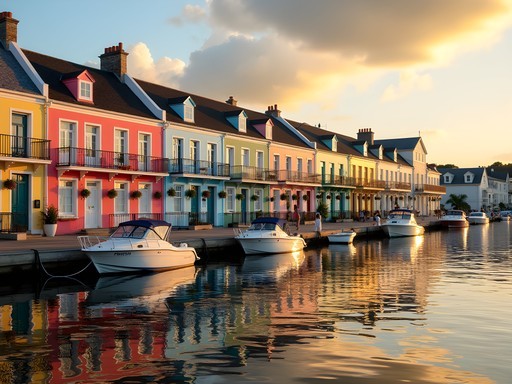
Creek Street and Downtown: Urban Photography with Character
Ketchikan's historic Creek Street—a boardwalk of colorful buildings perched on stilts over Ketchikan Creek—offers a completely different photographic palette. This former red-light district turned tourist area has genuine character, particularly during salmon runs when the creek fills with thousands of fish fighting upstream.
I found the best compositions came from experimenting with different vantage points along the boardwalk and from the Cape Fox Lodge hillside above. The reflections in the creek during calm moments create wonderful symmetrical compositions, whilst the weathered textures of the buildings themselves tell stories of Ketchikan's frontier past. Early morning, before the jewelry shops open, you'll have the boardwalk largely to yourself.
The Southeast Alaska Discovery Center downtown deserves at least two hours of your time. Beyond being an excellent introduction to the region's natural and cultural history, it offers climate-controlled respite for reviewing your images and planning your next shots. I spent a rainy afternoon there studying historical photographs of totem raising ceremonies, which fundamentally changed how I approached photographing the contemporary carved poles.

💡 Pro Tips
- Visit Creek Street during salmon runs (July-September) for the added dimension of wildlife photography
- The married man's trail stairway offers elevated views perfect for compressed perspective shots of the boardwalk
- Dolly's House Museum opens at 9am—photograph the exterior before the crowds arrive
- Rain on the boardwalk creates gorgeous reflections; don't pack your camera away when weather turns
Practical Considerations for Solo Photography Travel
Traveling solo to Ketchikan for photography requires some logistical planning, but the freedom it affords is invaluable. I based myself at the Black Bear Inn, a locally-owned bed and breakfast within walking distance of downtown. The owners, both Ketchikan natives, provided insider knowledge about tide times, weather patterns, and which days the large cruise ships would be in port (avoid those days at popular sites if possible).
Rental cars aren't essential for downtown and Creek Street, but you'll need transportation for Totem Bight and Saxman Village. I used a combination of the local bus service and occasional taxis, which proved more economical than a week-long rental. For the floatplane excursion and a day trip to Herring Cove for bear photography, I'd pre-booked through local operators.
The solo aspect worked beautifully for my photographic goals—I could spend three hours at a single location without feeling rushed, return to promising spots at different times of day, and change plans based on weather and light. That said, Ketchikan is remarkably safe and friendly; I never felt uncomfortable exploring alone, even in early morning hours. The local photography community is welcoming too—I connected with several Ketchikan photographers through social media before my trip, and they generously shared location suggestions and timing advice.
One unexpected essential: a quality insulated water bottle kept my coffee hot during those predawn shoots, and having warm beverages readily available made the wet, cool conditions far more bearable during extended outdoor sessions.
💡 Pro Tips
- Download offline maps before arrival—cell service can be spotty outside downtown
- The public library offers free WiFi for backing up images and researching locations
- Pack more memory cards than you think necessary; you'll shoot far more than anticipated
- Local restaurants close early; stock up on snacks for evening editing sessions
- Join the Ketchikan Photography Facebook group before your trip for current conditions and advice
Final Thoughts
Ketchikan challenged me as a photographer in the best possible ways. The technical demands of shooting in constant moisture, the ethical considerations of documenting indigenous culture respectfully, and the sheer visual richness of the landscape pushed me beyond my comfortable patterns. What I hadn't anticipated was how much the place would affect me beyond photography—the depth of cultural knowledge shared by Tlingit and Haida community members, the resilience required to thrive in such a demanding environment, and the way ancient stories carved in cedar continue to educate and inspire.
For solo photographers seeking more than just pretty landscapes, Ketchikan offers something increasingly rare: a destination where natural beauty and cultural depth intertwine inseparably. The images you'll capture here won't just fill your portfolio—they'll challenge you to think more deeply about the stories behind what you photograph and your responsibility in telling them. That's the kind of travel that stays with you long after you've processed the last RAW file.
✨ Key Takeaways
- Embrace the rain and mist as photographic assets rather than obstacles—they create Ketchikan's signature ethereal light quality
- Invest time in understanding the cultural significance of totems before photographing them; context creates more meaningful images
- Solo travel here offers unparalleled flexibility for photographers to work at their own pace and return to promising locations
- Book floatplane excursions early in your trip in case weather requires rescheduling
- The photographic opportunities extend far beyond landscapes—cultural documentation and urban character shots are equally rewarding
📋 Practical Information
Best Time to Visit
Late May through early September for optimal light and weather, though July-August offer salmon runs and extended daylight hours
Budget Estimate
$2,000-3,000 including mid-range accommodation, floatplane excursion, local transportation, and meals
Recommended Duration
7 days minimum to properly explore photography locations and allow for weather flexibility
Difficulty Level
Moderate

Comments
moonhero
The moisture thing is no joke! I was in Ketchikan last summer and my lens fogged up constantly going between the floatplane and outside. Learned real quick to keep silica packets in my camera bag. Did you get to shoot any of the Creek Street area? Those old buildings on stilts with the mist coming off the water made for some moody shots. Also curious what your approach was for asking permission at Saxman - I felt a bit awkward at first but everyone was super welcoming once I explained I was genuinely interested in the culture.
Caleb Lee
Creek Street was amazing! I actually have a whole section of shots from there that didn't make the post. And yes, at Saxman I always asked first and several elders were happy to share stories. That's where the real magic happened honestly.
islandone
Going in July - is it always misty?
Caleb Lee
Ketchikan gets 150+ inches of rain a year, so yeah, expect moisture! But July is actually one of the drier months. Bring rain gear and waterproof camera protection regardless. The mist is part of the charm honestly.
greenmood
I keep my gear in a waterproof bag when traveling to wet places - saved my camera more than once!
Jean Wells
Excellent technical breakdown of the lighting conditions. I visited Ketchikan in 2024 during a repositioning cruise and found the overcast conditions actually worked in my favor for totem photography - no harsh shadows to deal with. However, I struggled with the floatplane aerial shots due to propeller vibration affecting sharpness. What shutter speed did you find optimal? I was shooting at 1/1000 but wonder if faster would have helped. The cultural sensitivity discussion is particularly important - too many travel photographers treat indigenous sites as mere backdrops without engaging with the living culture behind them.
moonhero
Not the author but I found 1/1250 or faster helped with the vibration. Also shooting through the window vs open door makes a difference if you have that option.
greenmood
Those totem pole photos are incredible!!
Venture X
Premium card with 2X miles, $300 travel credit, Priority Pass